Home
Table of Contents


Presentation of Contents
A. How to use the document
1. Navigation
This document is well structured and easy to navigate through. Please navigate up and down through left panel Tabel of Contents.
2. Search
hit both 'Ctrl' + 'f', and type in the word and hit 'Enter' to search for. hit 'F3' to search for next occurrence.
3. Samples and Figures
Samples and figures provided in this document are not necessarily coherently in binding in design. It is up to the user to make his or her 'story' complete by applying the principles.
4. Version Icons
Icons like these 
 ... indicate the associated section is a new or revised section with a new version number.
... indicate the associated section is a new or revised section with a new version number.B. About EAT?
1. What is EAT?
EAT is a software tool. It was built to run on MS Windows. The head program is called Eat Manager in Windows GUI. It takes input Excel file(s) and produces an output files either in Excel spreadsheet, text or in HTML, while the Excel Sheets are industrial standard and the most popular software tool in data processing worldwide. The tool is very convenient and versatile.
2. System requirements
It requires :
- a Windows 7, 8, 10 or 11 OS system
- a Windows Microsoft.NET Framework 4.6.1
- an Internet browser
- a Microsoft Office Excel program, Google Sheets On-line or other equivalents
- a license from Teknewell
- The download may be blocked by your browser. Choose 'Keep' or 'Keep Anyway'.
- The zip file may be blocked by Windows, goto the zip file's property, unblock it, and then extract to your desired disk location.
- The program executable may be blocked by Windows or Virus Protection. Choose 'Run' or 'Run Anyway' or Excludsion.
3. Purposes
The output file contains accounting reports of financial accounts primary and summary for families and organizations.
4. How it works
A family member or company employees add basic account ledger records. These records are basic financial records and are minimum in number and the least time consuming. Once the ledger Excel files are collected at the directories defined in parameter file, the Eat Manager can run EAT command line tool and produce the report Excel file flashing easy.
5. Benefits
- EAT is a economic, cost-effective to own and convenient and safe to operate. Once EAT is installed and a accounting model is configured for business, there is no need to change the model often. The model is also easy to adapt if such a need arises. The only task requiring a user to take routinely is to enter ledger transactions according to business activities and create reports for analysis of account health (audit) and purposes.
- No fancy installation process to run and no host PC environmental variables to set up. Just unzip the downloaded zip file to be ready for production.
- EAT Tool makes family and company financial data available right away for college financial aid or other applications.
- EAT Tool allows a parent or a manager forecast or predict next month's account balances by utilizing previous month's average data, pattern and unusual transactions.
- By changing credit card's due date to 7th of each month and setting up auto payment on statement balance, you basically are left nothing to do except making checking account fund available for next month by transferring fund from savings to checking on 5th of each month right before the due date, and except downloading CSV statement files and pulling 2 or 3 amounts from banks and updating the ledger records and in the meantime auditing and monitoring the account's health.
- This bill-pay activity only happens once in 1 day of a month and saves you a lot of time and allows you to attend to other family activities. This EAT Tool does not electronically and automatically pull the data from banks. You must do the small amount of work to see if your accounts match up your bank accounts. Knowing your accounts are healthy makes you sleep tight at night.
- EAT tool is for managers to create financial reports of all accounts. One license is good for one manager of an organization unless there is a need to divide business to acquire multiple licenses.
- Multiple Excel files enable company to have multiple employees working from different departments to contribute adding ledger records.
- Eat does not transmit user accounting data across the Internet. So it is safe to operate and user financial data is by no means to be leaked away to create security worries. Eat may use Internet to verify license validity though.
6. License Agreement
Users should have at least once read the User Purchase and License Agreement at time of using the Trial version. Subsequent decision to purchase the software indicates user agrees without preservation the provisions set forth in the document of User Purchase and License Agreement.
Teknewell is a registered legal company in Massachusetts USA, The product tools are safe. Please also read the readme.txt if available.
Here you can access User Purchase and License Agreement
Teknewell is a registered legal company in Massachusetts USA, The product tools are safe. Please also read the readme.txt if available.
Here you can access User Purchase and License Agreement
C. How to acquire EAT
1. Ownership Time-line
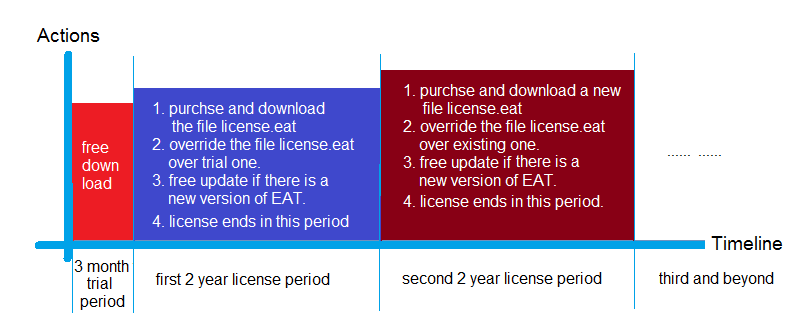
2. Trial Version
To download a trial version, click a menu item. The trial version only lasts for a few months. Follow on-screen instructions, and you should have downloaded the file through the browser. The zip file is like the pattern 'eat*.zip'. The browser, virus defender and Windows OS may block the zip file and its exe files as suspects. User should choose trust, 'run anyway' or exclude from protections.
3. Product Version
If you felt EAT is a useful tool and can help you manage your family's or company's financial accounts and analysis, and decided to use, then click a menu item to purchase the real product. The process is similar to that of the trial version.
D. Install EAT
1. Unzip file
Unzip the zip file, normally in 'download' directory. Save the files into a directory in which you will work in the future. This directory is called Installation Full Path (IFP).
2. Pin to Taskbar
The tool's main executable is 'EatUI.exe'. Making a Run Icon in the task bar will help to run the program easily. Goto IFP, right click on 'EatUi.exe', then click on 'Pin to Taskbar', and a new Icon will show up on the task bar. Click the icon to run the program.
E. Graphic user interface
1. Purpose
This latest program 'EatUi.exe' encompasses all functions of the tool. Because it is a Windows Form program, it is easy and direct to carry out tasks important to businesses. It serves as a overall manager for user. The program was developed at a later stage and replaces the previous Console applications. It is also straight forward or self explanatory to navigate around the interfaces. In this document we will not provide more details of each functions. User should be able to familiarize one self without issue. If not, send a support ticket to get a answer.
2. The Models box
On the left is the model box. The box lists all model files prefixed by 'model'. All model files reside in the directory 'model'. Refer Model in later chapter regarding commands available in Model file. When a model is selected, it becomes active and all subsequent functions are carried out for the model.
3. Instruction page
On the right is the box for all other pages. Instruction page contains an editing box to allow user to record instructional notes.
4. Model page
Model page presents the parameters of all commands in the Model file. User could alter the parameters to fit for a particular run.
5. Manual page
Manual page consists the locations and all manual input files. The word 'manual' indicates all commands are entered by user into input sheets of Excel files specified here.
6. Auto page
Auto page consists the locations and all bank CSV input files. User does not need to modify the CSV files. They can directly participate in the 'run'.
7. Run page
Run page is the dividing page. On its left are the pages of preparation before the execution. On its right are the pages of results of the execution. This page allows user to click a button to produce the reports. There are few argumental UI choices user could consider before the 'run'.
8. Log page
Log page lists all log files of the executions.
9. Rpt page
Rpt page lists all resulting report files which includes XLSX and HTML file types.
10. Archive page
Archive page lists all archived files. The archived files are not generated by the execution, and not subject to being deleted by the 'clean' operation. On the Log and Rpt pages there is a button 'Archive' user could click to archive a particular file. We recommned user to archive at least 2 files for each cycle. One is the report file that has beed reconciled, the other the result report file that has been forecasted. Archive is a great way to keep history files at bay for future references.
11. Backup page
Backup page provides a way to backup the tool and user's family or business accounting data to a location deemed safe and can be recovered if a break-down took place unexpectively. We recommend user to backup the files when significant additions of data have taken place, or at least after each cycle's forecast has been done successfully.
12. Clean page
Clean page allows user to delete files in the directory 'log' and 'rpt'. These files are created after each execution and cumulatively increasing in number. We recommend user to delete the files every half year and also consider a reasonal minimum number of files to be kept for refernece in immediate future.
13. Doc page
Doc page provides few URL link buttons for easy access of on-line User Manual and others.
14. Support page
Support page provides a URL link button to access the on-line support page.
15. Upgrade page
Upgrade page provides a URL link button to access the on-line upgrade page. Upgrade is free within the term of a valid license.
16. About page
About page describes informational detail about our company Teknewell Engineering.
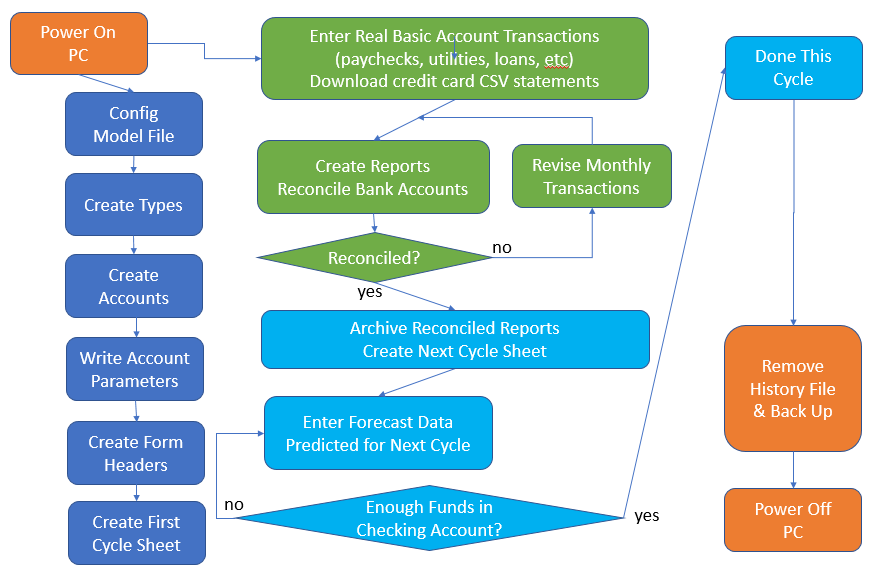
F. Work flow chart
1. The Chart

Follow the below work-flow chart which resembles a family monthly financial management activities.
G. The model
1. The model file
Under the directory 'model', user creates model files prefixed with 'model' like model-*.xlsx. In this file you can specify the location of input files. There are few commands available. See following table of commands. Note user can edit Excel file in Microsoft Office Excel, LibreOffice Calc or a Google Spreadsheet.
2. The input sheet files
Under the directory specified by command 'scan' in model file, you can supply Input sheet files prefixed with 'eat' like eat-*.xlsx. The commands are described in following chapter.
3. The bank CSV files
Under the directory specified by command 'scanBank' in model file, you can supply Credit Card Bank CSV statement files. Further detail will be provided in a later chapter.
H. The model commands
1. scan
Fields:
| Column | What | Example |
| A | CommandName | scan |
| B | Directory | sale |
- Column A 'CommandName' is used to specify the command.
- Column B 'Directory' is used to specify the directory where the input files are located.
| Sample: 'scan': |
 |
2. scan
Fields:
| Column | What | Example |
| A | CommandName | scan |
| B | Directory | service |
- Column A 'CommandName' is used to specify the command.
- Column B 'Directory' is used to specify the directory where the input files are located.
| Sample: 'scan': |
| |
2nd sample
3. scanBank
Fields:
| Column | What | Example |
| A | CommandName | scanBank |
| B | Directory | bank-23-1st-quater |
- Column A 'CommandName' is used to specify the command.
- Column B 'Directory' is used to specify the directory where the bank CSV statement files are located.
| Sample: 'scanBank': |
| |
4. setDebugMode
Fields:
| Column | What | Example |
| A | CommandName | setDebugMode |
| B | Flag | yes/no |
- Column A 'CommandName' is used to specify the command.
- Column B 'Flag' is used to specify the flag value to switch the debug mode. The debug mode will enable to write extra log data for examination.
| Sample: 'setDebugMode': |
| |
5. ExternalCsvMapFile
Fields:
| Column | What | Example |
| A | CommandName | ExternalCsvMapFile |
| B | Flag | yes/no |
| C | FileName | data\csvmaps.xlsx |
- Column A 'CommandName' is used to specify the command.
- Column B 'Flag' is used to specify the flag value to whether or not use the map file.
- Column C 'FileName' is used to specify the name of the file. This file is supplied by Teknewell. The file is used to translate the bank's credit card CSV file into this tool's data input.
| Sample: 'ExternalCsvMapFile': |
| |
6. SaveInputFiles
Fields:
| Column | What | Example |
| A | CommandName | SaveInputFiles |
| B | Flag | yes/no |
- Column A 'CommandName' is used to specify the command.
- Column B 'Flag' is used to specify the flag value to whether or not save all input files.
| Sample: 'SaveInputFiles': |
| |
7. createOneBook
Fields:
| Column | What | Example |
| A | CommandName | createOneBook |
| B | Flag | yes/no |
- Column A 'CommandName' is used to specify the command.
- Column B 'Flag' is used to specify the flag value to whether or not create a consolidated input one book. This book stores all input sheets as if the user has entered them in one book with the categorizing method we recommend.
| Sample: 'createOneBook': |
| |
8. createAccountHierarchy
Fields:
| Column | What | Example |
| A | CommandName | createAccountHierarchy |
| B | Flag | yes/no |
- Column A 'CommandName' is used to specify the command.
- Column B 'Flag' is used to specify the flag value to whether or not create an account hierarchy book. This book stores all account relationships in a hierarchical way by Command GetFrom and PullFrom.
| Sample: 'createAccountHierarchy': |
| |
9. cutOffDate
Fields:
| Column | What | Example |
| A | CommandName | cutOffDate |
| B | Flag | yes/no |
| C | Month | 4 |
| D | Date | 30 |
| E | Year | 2023 |
- Column A 'CommandName' is used to specify the command.
- Column B 'Flag' is used to specify the flag value to whether or not create a sheet for InitCommands with a Cut Off Date.
- Column C 'Month' is used to specify the month of the Cut Off Date.
- Column D 'Date' is used to specify the date of the Cut Off Date.
- Column E 'Year' is used to specify the year of the Cut Off Date.
| Sample: 'cutOffDate': |
| |
10. useStyleTemplates
Fields:
| Column | What | Example |
| A | CommandName | useStyleTemplates |
| B | Flag | yes/no |
| C | FileName | data\csvmaps.xlsx |
- Column A 'CommandName' is used to specify the command.
- Column B 'Flag' is used to specify the flag value to whether or not use the map file.
- Column C 'FileName' is used to specify the name of the file. The file is used to provide style to the end reports. The sample model downloaded includes such a file. It uses a rule of sheet name matching sheet name.
| Sample: 'useStyleTemplates': |
| |
11. createNextCycle
Fields:
| Column | What | Example |
| A | CommandName | createNextCycle |
| B | Flag | yes/no |
- Column A 'CommandName' is used to specify the command.
- Column B 'Flag' is used to specify the flag value to whether or not execute the command 'prepareSheet'.
| Sample: 'createNextCycle': |
| |
12. numberOfFilesToKeep
Fields:
| Column | What | Example |
| A | CommandName | numberOfFilesToKeep |
| B | The number | 200 |
- Column A 'CommandName' is used to specify the command.
- Column B 'The number' is used to specify an integer number which is used to keep the latest files within the limit when user cleans the history files in directory log, rpt and copy.
| Sample: 'numberOfFilesToKeep': |
| |
I. The input sheets
1. General
The input sheets are a collection of Excel Sheets from 1 or multiple Excel files. Following rules are enforced to qualify as input commands.
- The Excel files reside in a directory specified by command 'scan' in Model.
- The Excel file names contain a prefix 'eat'.
- The sheet names contain a prefix 'Sheet' or 'Cycle'.
- On column 1 of each sheet, a valid command name must be there and its syntax must be complying with what defined in this document.
2. Command dependencies
Following listed the order in which the later ones depend on the previous ones.
- Define account types.
- Define accounts.
- Define account modifiers.
- Define account header forms.
- Define analytical commands.
- Define cycle sheet.
- Add records on form.
3. Arithmetic Expression
Following is the EAT definition of Arithmetic Expression.
- Basic Operands
Operand Function Field Name These field names are the ones that were already defined as a table's column names. Double Any valid double value character sequence. For example, 100.15 or -90.07. PREV This reserved word indicates the previous row value at the same field is used in calculation.
- 4 2-operand arithmetic operators
Operator Function / Division * Multiplication - Subtraction + Addition
- MathCase Formula
- Wrap multiple Arithmetic Expression with MathCase Formula.
- MathCase Formula goes like this: 'MathCase [condition 1]{Arithmetic Expression 1} [condition 2]{Arithmetic Expression 2} [condition 3]{Arithmetic Expression 3} '.
- This MathCase Formula evaluates each condition from left to right, and if one is failed, continue next one. If one is true, its Arithmetic Expression is returned, and all other conditions that follow will be ignored.
- This MathCase Formula is only applicable in 'type' command.
- StringCase Formula
- StringCase acts like MathCase except the values are treated as string.
- General rules
- The operator order goes: First division, seocond multiplication, third subtraction, forth addition.
- User can change the operator order by placing parenthesis '(' and ')'.
4. Conditional Logic Expression
Following is the EAT definition of Conditional Expression.
- Basic Operands
Operand Function Field Name These field names are the ones that were already defined as a table's column names. String Any valid charactor sequence. It does not need to be double quoted. For example, Bank of America. It shouldn't be a Field Name, otherwise it will be treated so. Double Any valid double value character sequence. For example, 100.15 or -90.07.
- 8 none-case-sensitive 2 operand comparison operators
If the 2 operand values are deemed to be double values, the operator is a streight math equivalent one. If one of the 2 operand values is a double value and the other is empty, then the empty one is converted to 0.0, the the operator is a streight math equivalent one. Following table is a description for String Comparison only.Operator Function == If the 2 strings are not in equal length, it is false; If one of their chars in same index position is not same ('a' is considered the same as 'A' in none-case-sensitive), it is false. != If the 2 strings are not in equal length, it is true; If one of their chars in same index position is not same ('a' is considered the same as 'A' in none-case-sensitive), it is true. +> If first string contains second string, it is true, otherwise false. -> If first string does not contains second string, it is true, otherwise false. > First leading and trailing Space chars are removed and second the short string is padded with space char ' ' to the length of the longer string, then compare each char starting from the left most to the right end, if the char at same index position in first string is smaller, it is false. otherwise true; < First leading and trailing Space chars are removed and second the short string is padded with space char ' ' to the length of the longer string, then compare each char starting from the left most to the right end, if the char at same index position in first string is larger, it is false. otherwise true; >= First apply the rule for operator '==', if false, apply the rule for operator '>'. <= First apply the rule for operator '==', if false, apply the rule for operator '<'.
- 8 case-sensitive 2 operand comparison operators
Operator Function #== same as the equivalent one above except a sharp char # is added at leading position and it is case-sensitive. #!= same as the equivalent one above except a sharp char # is added at leading position and it is case-sensitive. #+> same as the equivalent one above except a sharp char # is added at leading position and it is case-sensitive. #-> same as the equivalent one above except a sharp char # is added at leading position and it is case-sensitive. #>= same as the equivalent one above except a sharp char # is added at leading position and it is case-sensitive. #<= same as the equivalent one above except a sharp char # is added at leading position and it is case-sensitive. #> same as the equivalent one above except a sharp char # is added at leading position and it is case-sensitive. #< same as the equivalent one above except a sharp char # is added at leading position and it is case-sensitive.
- logic operators
Operator Function && this operator takes 2 operands. If both operands are true, then the expression is true, otherwise false. || this operator takes 2 operands. If one of them is true, then the expression is true, otherwise false. The operator "&&" is evaluated first and "||" second. Use parenthesises '(' and ')' to promote expression priority.
- EAT does not offer singular logic operator !
- General rules
- If the expression is true, then the record is evaluated to be picked up.
- Use a boolean value 'true' or 'false' to arbitrarily indicate the condition value.
- For logic operators, the operator "&&" is evaluated first, the operator "||" is evaluated second. If you have a different order, use the parenthesis '(' and ')'. The expression in the parenthesises is evaluated first, then proceed to the rest of the entire expression.
- See example in command CopyAccount below.
- The char # called Sharp means more detailed and clearer. and Case-sensitive means considering more details. So they do connect in meaning, so good for memory to remember.
J. The input commands
1. DfnType
Fields:
| Column | What | Example |
| A | CommandName | DfnType |
| B | TypeName | UtilityBill |
| C | FieldName | Minus |
| D | FieldName | Plus |
| E | FieldName | Net|Calc=Plus-Minus| |
| F | FieldName | Balance|Calc=MyPrev+Net |
- Column A 'CommandName' is used to specify the command.
- Column B 'TypeName' is used to specify the type name.
- Column C 'FieldName' is used to specify the amount deducted.
- Column D 'FieldName' is used to specify the amount added.
- Column E 'FieldName' is used to specify the net amount.
- Column F 'FieldName' is used to specify the incremental amount.
| Sample: 'DfnType': |
| |
Description:
The command 'type' is the first record a user has to write because a user has to start with an account and an account depends on a type. The command 'type' specifies the fields an account uses. A 'type' record comes with several other features like hiding a column positioning a column or a column calculation. Once a Type is defined one or more account(s) can derive from it.
The command 'type' is the first record a user has to write because a user has to start with an account and an account depends on a type. The command 'type' specifies the fields an account uses. A 'type' record comes with several other features like hiding a column positioning a column or a column calculation. Once a Type is defined one or more account(s) can derive from it.
The reserved word 'MyPrev':
The key word 'MyPrev' is reserved and represents a value from previous record in order in the same field.
The key word 'MyPrev' is reserved and represents a value from previous record in order in the same field.
The reserved word 'ConstE':
The key word 'ConstE' is reserved and represents a value of math constant. The value is 2.7182818284590451. User can use 'ConstE' or type in directly the value.
The key word 'ConstE' is reserved and represents a value of math constant. The value is 2.7182818284590451. User can use 'ConstE' or type in directly the value.
The reserved word 'ConstPI':
The key word 'ConstPI' is reserved and represents a value of math constant. The value is 3.1415926535897931. User can use 'ConstPI' or type in directly the value.
The key word 'ConstPI' is reserved and represents a value of math constant. The value is 3.1415926535897931. User can use 'ConstPI' or type in directly the value.
Hide a field:
In 'Note|Hide=yes' 2 strings are seperated by |. The first string is the field name 'Note' second string is 'Hide=yes'. 'yes' means this field is to be hidden in resulting report. Use 'Hide=no' to do the opposite.
In 'Note|Hide=yes' 2 strings are seperated by |. The first string is the field name 'Note' second string is 'Hide=yes'. 'yes' means this field is to be hidden in resulting report. Use 'Hide=no' to do the opposite.
Calculate a field:
In 'Balance|Calc=MyPrev+Net' 2 strings are seperated by |. The first string is the field name 'Balance' second string is 'Calc=MyPrev+Net'. The second string 'Calc=MyPrev+Net' means this field is calculated from the result the sum of the previous value and the value of field 'Net'. Currently the arithmetic calculation only involves the 4 basic operators + - * and / with round brackets '(' and ')' for example Calc=(Plus-Minus)*Scale+MyPrev'. The char 'c' is reserved to mark the calculation. Refer to Arithmetic Expression above.
In 'Balance|Calc=MyPrev+Net' 2 strings are seperated by |. The first string is the field name 'Balance' second string is 'Calc=MyPrev+Net'. The second string 'Calc=MyPrev+Net' means this field is calculated from the result the sum of the previous value and the value of field 'Net'. Currently the arithmetic calculation only involves the 4 basic operators + - * and / with round brackets '(' and ')' for example Calc=(Plus-Minus)*Scale+MyPrev'. The char 'c' is reserved to mark the calculation. Refer to Arithmetic Expression above.
Position a field:
In 'Description|Index=5' 2 strings are seperated by |. The first string is the field name 'Description' the second string is 'Index=5'. The second string 'Index=5' means this field is to be shown in position 5 relatively.
In 'Description|Index=5' 2 strings are seperated by |. The first string is the field name 'Description' the second string is 'Index=5'. The second string 'Index=5' means this field is to be shown in position 5 relatively.
Reset balance:
In 'GroupBalance|Calc=gMyPrev+Net' the formula will just act like 'Calc=MyPrev+Net' except that the GroupBalance will start from 0.0 when it arrives on a different group of the record key on which the transactions were sorted.
In 'GroupBalance|Calc=gMyPrev+Net' the formula will just act like 'Calc=MyPrev+Net' except that the GroupBalance will start from 0.0 when it arrives on a different group of the record key on which the transactions were sorted.
Default fields:
- 'DateSeqAsKey' combines field Year (4 digits) Month (2 digits) Date (2 digits) and SeqNumber (4 digits) seperated by a '.'. This field serves as a default record and group key which in turn serves other operations. User can use command 'SetKeyField' to set a different key.
- 'Year'
- 'Month'
- 'Date'
- 'SeqNumber' is an integer number. This allows multiple transactions on the same date.
- 'Marker' holds the string 'good here' to allow pulling over to another account.
- 'HyperLinkFieldId' is internally used for HyperLink for field Source Target and LinkTo.
- 'Source' holds the account name the row transactional data comes from.
- 'Target' holds the account name the row transactional data to be updated to.
2. DfnType
Fetch Command:
This coomand 'Fetch' allows to copy data from a source to this field in all records.
This coomand 'Fetch' allows to copy data from a source to this field in all records.
Fields:
| Column | What | Example |
| A | CommandName | DfnType |
| B | TypeName | UtilityBill |
| C | FieldName | test02|Fetch=UtilityBase|RateAmount|2024.8.16.30 |
- Column A 'CommandName' is used to specify the command.
- Column B 'TypeName' is used to specify the type name.
- Column C 'FieldName' is used to specify the value for test02 by using the command "Fetch". The | is a second level seperator of |. UtilityBase is an account. RateAmount is the field from which a value is fetched. '2024.8.16.30' is the standard key value which is under DateSeqAsKey.
| Sample: 'DfnType': |
| |
3. DfnType
Field Directives and Math:
These are the directives and math function names. All directives can be placed one after another in multiple instances in front of a field separated by colon :. For example PrevOf:Round:Reading here Reading is the field.
These are the directives and math function names. All directives can be placed one after another in multiple instances in front of a field separated by colon :. For example PrevOf:Round:Reading here Reading is the field.
| Sample: 'DfnType': |
| |
MyPrev
This directive instructs to get the current field value from the previous record in sorting. The current field is a field where the calculation is defined. There is no additional field name is needed.
This directive instructs to get the current field value from the previous record in sorting. The current field is a field where the calculation is defined. There is no additional field name is needed.
gMyPrev
This directive instructs to get the current field value from the previous record in sorting. The current field is a field where the calculation is defined. But if the currect record is the first record in a group the previous value will be 0.0. There is no additional field name is needed.
This directive instructs to get the current field value from the previous record in sorting. The current field is a field where the calculation is defined. But if the currect record is the first record in a group the previous value will be 0.0. There is no additional field name is needed.
PrevOf
This directive instructs to get the field value from the previous record in sorting. This directive is placed in front of a field separated by colon : for example 'PrevOf:Reading'.
This directive instructs to get the field value from the previous record in sorting. This directive is placed in front of a field separated by colon : for example 'PrevOf:Reading'.
gPrevOf
This directive instructs to get the field value from the previous record in sorting. But if the currect record is the first record in a group the previous value will be 0.0. This directive is placed in front of a field separated by colon : for example 'PrevOf:Reading'.
This directive instructs to get the field value from the previous record in sorting. But if the currect record is the first record in a group the previous value will be 0.0. This directive is placed in front of a field separated by colon : for example 'PrevOf:Reading'.
FirstOf
This directive instructs to get the field value from the first row in entire table in sorting. So the value is renewed once in table and referenced in calculation for subsequent rows in table regardless Group Fields. This directive is placed in front of a field separated by colon : for example 'FirstOf:Total'.
This directive instructs to get the field value from the first row in entire table in sorting. So the value is renewed once in table and referenced in calculation for subsequent rows in table regardless Group Fields. This directive is placed in front of a field separated by colon : for example 'FirstOf:Total'.
gFirstOf
This directive instructs to get the field value from the first row in a group in sorting. So the value is renewed in each group and referenced in calculation for subsequent rows in the group. This directive is placed in front of a field separated by colon : for example 'gFirstOf:Total'.
This directive instructs to get the field value from the first row in a group in sorting. So the value is renewed in each group and referenced in calculation for subsequent rows in the group. This directive is placed in front of a field separated by colon : for example 'gFirstOf:Total'.
Round
This directive instructs to round the field to an integer. This directive is placed in front of a field separated by colon : for example 'Round:UsageTFAed' which renders no decimals. Following are 3 different variations.
This directive instructs to round the field to an integer. This directive is placed in front of a field separated by colon : for example 'Round:UsageTFAed' which renders no decimals. Following are 3 different variations.
- 'Round,2:UsageTFAed'. Here ',' is a separator. 2 is the number of decimals.
- 'Round,MidpointRounding:UsageTFAed'. Here ',' is a separator.MidpointRounding is a type of Round either ToEven or AwayFromZero.
- 'Round,2,MidpointRounding:UsageTFAed'. Here it has 2 ',' separators. 2 is the number of decimals. MidpointRounding is a type of Round either ToEven or AwayFromZero.
Max
This directive instructs to pick the larger one among 2 values. This directive is placed in front of a field separated by colon : for example 'Max,2ndField:FstField'. Here ',' is the separator. 2ndField is the second field. FstField is the first field.
This directive instructs to pick the larger one among 2 values. This directive is placed in front of a field separated by colon : for example 'Max,2ndField:FstField'. Here ',' is the separator. 2ndField is the second field. FstField is the first field.
Min
This directive instructs to pick the smaller one among 2 values. This directive is placed in front of a field separated by colon : for example 'Min,2ndField:FstField'. Here ',' is the separator. 2ndField is the second field. FstField is the first field.
This directive instructs to pick the smaller one among 2 values. This directive is placed in front of a field separated by colon : for example 'Min,2ndField:FstField'. Here ',' is the separator. 2ndField is the second field. FstField is the first field.
Log
This directive instructs to compute a Log value. This directive is placed in front of a field separated by colon : for example 'Log:Field'. Here the result will be the Log value of Field. There is a variation 'Log,NewBase:Field'. Here the result will be the Log value of Field based on the NewBase. Again ',' is the separator.
This directive instructs to compute a Log value. This directive is placed in front of a field separated by colon : for example 'Log:Field'. Here the result will be the Log value of Field. There is a variation 'Log,NewBase:Field'. Here the result will be the Log value of Field based on the NewBase. Again ',' is the separator.
Log10
This directive instructs to compute a Log10 value. This directive is placed in front of a field separated by colon : for example 'Log10:Field'. Here the result will be the Log value of Field based on 10.
This directive instructs to compute a Log10 value. This directive is placed in front of a field separated by colon : for example 'Log10:Field'. Here the result will be the Log value of Field based on 10.
IEEERemainder
This directive instructs to compute a IEEERemainder value. This directive is placed in front of a field separated by colon : for example 'IEEERemainder,2ndField:FstField'. Here ',' is the separator. 2ndField is the second field. FstField is the first field.
This directive instructs to compute a IEEERemainder value. This directive is placed in front of a field separated by colon : for example 'IEEERemainder,2ndField:FstField'. Here ',' is the separator. 2ndField is the second field. FstField is the first field.
Atan2
This directive instructs to compute a Atan2 value. This directive is placed in front of a field separated by colon : for example 'Atan2,2ndField:FstField'. Here ',' is the separator. 2ndField is the second field. FstField is the first field.
This directive instructs to compute a Atan2 value. This directive is placed in front of a field separated by colon : for example 'Atan2,2ndField:FstField'. Here ',' is the separator. 2ndField is the second field. FstField is the first field.
Pow
This directive instructs to compute a Pow value. This directive is placed in front of a field separated by colon : for example 'Pow,2ndField:FstField'. Here ',' is the separator. 2ndField is the second field. FstField is the first field.
This directive instructs to compute a Pow value. This directive is placed in front of a field separated by colon : for example 'Pow,2ndField:FstField'. Here ',' is the separator. 2ndField is the second field. FstField is the first field.
Truncate
This directive instructs to compute a Truncate value. This directive is placed in front of a field separated by colon : for example 'Truncate:FstField'. Here FstField is the only field.
This directive instructs to compute a Truncate value. This directive is placed in front of a field separated by colon : for example 'Truncate:FstField'. Here FstField is the only field.
Abs
This directive instructs to compute a Abs value. This directive is placed in front of a field separated by colon : for example 'Abs:FstField'. Here FstField is the only field.
This directive instructs to compute a Abs value. This directive is placed in front of a field separated by colon : for example 'Abs:FstField'. Here FstField is the only field.
Acos
This directive instructs to compute a Acos value. This directive is placed in front of a field separated by colon : for example 'Acos:FstField'. Here FstField is the only field.
This directive instructs to compute a Acos value. This directive is placed in front of a field separated by colon : for example 'Acos:FstField'. Here FstField is the only field.
Asin
This directive instructs to compute a Asin value. This directive is placed in front of a field separated by colon : for example 'Asin:FstField'. Here FstField is the only field.
This directive instructs to compute a Asin value. This directive is placed in front of a field separated by colon : for example 'Asin:FstField'. Here FstField is the only field.
Atan
This directive instructs to compute a Atan value. This directive is placed in front of a field separated by colon : for example 'Atan:FstField'. Here FstField is the only field.
This directive instructs to compute a Atan value. This directive is placed in front of a field separated by colon : for example 'Atan:FstField'. Here FstField is the only field.
Ceiling
This directive instructs to compute a Ceiling value. This directive is placed in front of a field separated by colon : for example 'Ceiling:FstField'. Here FstField is the only field.
This directive instructs to compute a Ceiling value. This directive is placed in front of a field separated by colon : for example 'Ceiling:FstField'. Here FstField is the only field.
Cos
This directive instructs to compute a Cos value. This directive is placed in front of a field separated by colon : for example 'Cos:FstField'. Here FstField is the only field.
This directive instructs to compute a Cos value. This directive is placed in front of a field separated by colon : for example 'Cos:FstField'. Here FstField is the only field.
Cosh
This directive instructs to compute a Cosh value. This directive is placed in front of a field separated by colon : for example 'Cosh:FstField'. Here FstField is the only field.
This directive instructs to compute a Cosh value. This directive is placed in front of a field separated by colon : for example 'Cosh:FstField'. Here FstField is the only field.
Exp
This directive instructs to compute a Exp value. This directive is placed in front of a field separated by colon : for example 'Exp:FstField'. Here FstField is the only field.
This directive instructs to compute a Exp value. This directive is placed in front of a field separated by colon : for example 'Exp:FstField'. Here FstField is the only field.
Floor
This directive instructs to compute a Floor value. This directive is placed in front of a field separated by colon : for example 'Floor:FstField'. Here FstField is the only field.
This directive instructs to compute a Floor value. This directive is placed in front of a field separated by colon : for example 'Floor:FstField'. Here FstField is the only field.
Sin
This directive instructs to compute a Sin value. This directive is placed in front of a field separated by colon : for example 'Sin:FstField'. Here FstField is the only field.
This directive instructs to compute a Sin value. This directive is placed in front of a field separated by colon : for example 'Sin:FstField'. Here FstField is the only field.
Sinh
This directive instructs to compute a Sinh value. This directive is placed in front of a field separated by colon : for example 'Sinh:FstField'. Here FstField is the only field.
This directive instructs to compute a Sinh value. This directive is placed in front of a field separated by colon : for example 'Sinh:FstField'. Here FstField is the only field.
Sqrt
This directive instructs to compute a Sqrt value. This directive is placed in front of a field separated by colon : for example 'Sqrt:FstField'. Here FstField is the only field.
This directive instructs to compute a Sqrt value. This directive is placed in front of a field separated by colon : for example 'Sqrt:FstField'. Here FstField is the only field.
Tan
This directive instructs to compute a Tan value. This directive is placed in front of a field separated by colon : for example 'Tan:FstField'. Here FstField is the only field.
This directive instructs to compute a Tan value. This directive is placed in front of a field separated by colon : for example 'Tan:FstField'. Here FstField is the only field.
Tanh
This directive instructs to compute a Tanh value. This directive is placed in front of a field separated by colon : for example 'Tanh:FstField'. Here FstField is the only field.
This directive instructs to compute a Tanh value. This directive is placed in front of a field separated by colon : for example 'Tanh:FstField'. Here FstField is the only field.
4. DfnAccount
Fields:
| Column | What | Example |
| A | CommandName | DfnAccount |
| B | AccountName | GasBill |
| C | TypeName | UtilityBill |
| D | CategoryName | Utility |
| E | ReportFlag | yes/no |
| F | Description | any notes |
- Column A 'CommandName' is used to specify the command.
- Column B 'AccountName' is used to specify the account name.
- Column C 'TypeName' is used to specify the type name the account is going to derive from
- Column D 'CategoryName' is used to specify the category the account falls in. The category is used to group accounts together on reports.
- Column E 'ReportFlag' is used to specify the report flag. 'yes' means to show the account records on report, 'no' otherwise.
- Column F 'Description' is used to specify notes a user can take and has no impact on reports.
| Sample: 'DfnAccount': |
| |
Description:
Defining an account is quite simple. Multiple accounts can be grouped together and be derived from a same 'type'.
Defining an account is quite simple. Multiple accounts can be grouped together and be derived from a same 'type'.
5. DfnEntryForm
Fields:
| Column | What | Example |
| A | CommandName | DfnEntryForm |
| B | AccountName | Checking |
| C | FormName | Way01 |
| D | FieldName | Year |
| E | FieldName | Month |
- Column A 'CommandName' is used to specify the command.
- Column B 'AccountName' is used to specify the account name.
- Column C 'FormName' is used to specify the form name to enter data in.
- Column D 'FieldName' is used to specify the field name for which a value can be entered in command 'JnlFormAdd' at the same column.
- Column E 'FieldName' is used to specify more fields are listed beyond.
| Sample: 'DfnEntryForm': |
| |
Description:
This command defines a data entry form for an account. A different form can be defined by a different form name at column C. This command is used in conjunction with command 'JnlFormAdd'. The values entered in the latter command must match the columns in this command 'DfnEntryForm'. This command can only be written once for the same form or an warning is logged.
This command defines a data entry form for an account. A different form can be defined by a different form name at column C. This command is used in conjunction with command 'JnlFormAdd'. The values entered in the latter command must match the columns in this command 'DfnEntryForm'. This command can only be written once for the same form or an warning is logged.
6. DfnEntryForm
Fields:
| Column | What | Example |
| A | CommandName | DfnEntryForm |
| B | AccountName | Checking |
| C | FormName | Way01 |
| D | FieldName | Year |
| E | FieldName | Month |
- Column A 'CommandName' is used to specify the command.
- Column B 'AccountName' is used to specify the account name.
- Column C 'FormName' is used to specify the form name to enter data in.
- Column D 'FieldName' is used to specify the field name for which a value can be entered in command 'JnlFormAdd' at the same column.
- Column E 'FieldName' is used to specify more fields are listed beyond.
| Sample: 'DfnEntryForm': |
| |
Description:
This command defines a data entry form for an account. A different form can be defined by a different form name at column C. This command is used in conjunction with command 'JnlFormAdd'. The values entered in the latter command must match the columns in this command 'DfnEntryForm'. This command can only be written once for the same form or an warning is logged.
This command defines a data entry form for an account. A different form can be defined by a different form name at column C. This command is used in conjunction with command 'JnlFormAdd'. The values entered in the latter command must match the columns in this command 'DfnEntryForm'. This command can only be written once for the same form or an warning is logged.
7. DfnEntryForm
Description:
Second sample.
Second sample.
| Sample: 'DfnEntryForm': |
| |
8. JnlEasyAdd
Fields:
| Column | What | Example |
| A | CommandName | JnlEasyAdd |
| B | AccountName | Checking |
| C | FieldName | Year |
| D | FieldValue | 2023 |
- Column A 'CommandName' is used to specify the command.
- Column B 'AccountName' is used to specify the account name.
- Column C 'FieldName' is used to specify the field name to enter data for.
- Column D 'FieldValue' is used to specify the field value for the field right before it on the left.
| Sample: 'JnlEasyAdd': |
| |
Description:
This is a free style of data entry method. Starting at cell C the field name and value appear as a pair one after another. If user needed to insert blank cell a pair of blank cells must be entered so that all the pairs start at a column of odd number like 3 5 etc. Here column C is odd number 3.
This is a free style of data entry method. Starting at cell C the field name and value appear as a pair one after another. If user needed to insert blank cell a pair of blank cells must be entered so that all the pairs start at a column of odd number like 3 5 etc. Here column C is odd number 3.
9. JnlEasyAdd
Description:
Second sample.
Second sample.
| Sample: 'JnlEasyAdd': |
| |
10. JnlEasyAdd
Description:
Third sample with formula 'PullFrom'. This 'PullFrom' formula has 3 or 4 fields separated by char '|'. The 4th field is optional can be omitted. When omitted the default key phrase 'good here' is used to validate the row in which a value is pull from or otherwise the user key word is used.
Third sample with formula 'PullFrom'. This 'PullFrom' formula has 3 or 4 fields separated by char '|'. The 4th field is optional can be omitted. When omitted the default key phrase 'good here' is used to validate the row in which a value is pull from or otherwise the user key word is used.
| Sample: 'JnlEasyAdd': |
| |
11. JnlFormAdd
Fields:
| Column | What | Example |
| A | CommandName | JnlFormAdd |
| B | AccountName | Checking |
| C | FormName | Way01 |
| D | FieldValue | Year |
| E | FieldName | Month |
- Column A 'CommandName' is used to specify the command.
- Column B 'AccountName' is used to specify the account name.
- Column C 'FormName' is used to specify the form name to enter data in.
- Column D 'FieldValue' is used to specify the field value that can be entered according to its form.
- Column E 'FieldName' is used to specify more field values are listed beyond.
| Sample: 'JnlFormAdd': |
| |
Description:
This command allows user to enter transactional record values according to its form defined in command 'DfnEntryForm'.
This command allows user to enter transactional record values according to its form defined in command 'DfnEntryForm'.
12. JnlEasyRepeat
| Sample: 'JnlEasyRepeat': |
| |
Description:
This command has the same syntax as the command 'JnlEasyAdd'. It will duplicates the new 'JnlEasyAdd' command in all sheets prefixed with 'Cycle'. This new command 'JnlEasyAdd' will copy the field Year Month and Date from a record that has the same SeqNumber. User could provide a specific Year Month and Date or write 'Copy' at cell of Year. The 'Copy' phrase indicates its Year Month Date will be copied over from the row that has same SeqNumber and on the same sheet.
This command has the same syntax as the command 'JnlEasyAdd'. It will duplicates the new 'JnlEasyAdd' command in all sheets prefixed with 'Cycle'. This new command 'JnlEasyAdd' will copy the field Year Month and Date from a record that has the same SeqNumber. User could provide a specific Year Month and Date or write 'Copy' at cell of Year. The 'Copy' phrase indicates its Year Month Date will be copied over from the row that has same SeqNumber and on the same sheet.
13. JnlFormRepeat
| Sample: 'JnlFormRepeat': |
| |
Description:
This command has the same syntax as the command 'JnlFormAdd'. It will duplicates the new 'JnlFormAdd' command in all sheets prefixed with 'Cycle'. This new command 'JnlFormAdd' will copy the field Year Month and Date from a record that has the same SeqNumber. User could provide a specific Year Month and Date or write 'Copy' at cell of Year. The 'Copy' phrase indicates its Year Month Date will be copied over from the row that has same SeqNumber and on the same sheet. This command inherits the header form definition from account named in cell B and form named in cell C.
This command has the same syntax as the command 'JnlFormAdd'. It will duplicates the new 'JnlFormAdd' command in all sheets prefixed with 'Cycle'. This new command 'JnlFormAdd' will copy the field Year Month and Date from a record that has the same SeqNumber. User could provide a specific Year Month and Date or write 'Copy' at cell of Year. The 'Copy' phrase indicates its Year Month Date will be copied over from the row that has same SeqNumber and on the same sheet. This command inherits the header form definition from account named in cell B and form named in cell C.
14. JnlFormSubRepeat
| Sample: 'JnlFormSubRepeat': |
| |
Description:
This command is a variation of the command JnlFormRepeat. Its second column B was oringinally for an account name but now for a conbination of a prefix key word and an account name separated by char |. but user could also name the sheet as CycleJohn2024March. So user writes in cell B the kew word 'John|AccountName' then this command is only copied to sheet prefixed by 'CycleJohn'. Note here 'John' becomes a second key word after first key word 'cycle'. All cells after to the right remain the same. It inherits the Header form definition for account named in cell B's second string.
This command is a variation of the command JnlFormRepeat. Its second column B was oringinally for an account name but now for a conbination of a prefix key word and an account name separated by char |. but user could also name the sheet as CycleJohn2024March. So user writes in cell B the kew word 'John|AccountName' then this command is only copied to sheet prefixed by 'CycleJohn'. Note here 'John' becomes a second key word after first key word 'cycle'. All cells after to the right remain the same. It inherits the Header form definition for account named in cell B's second string.
15. JnlAddByLink
Fields:
| Column | What | Example |
| A | CommandName | JnlAddByLink |
| B | SourceAccountName | DevGasss |
| C | SourceFieldName | Minus |
| D | TargetAccountName | BaChecking |
| E | TargetFieldName | Minus |
| F | MatchWord | Link |
| G | FieldName | Category |
| H | FieldValue | Bill |
- Column A 'CommandName' is used to specify the command.
- Column B 'SourceAccountName' is used to specify the source account name.
- Column C 'SourceFieldName' is used to specify the source account field name.
- Column D 'TargetAccountName' is used to specify the target account name.
- Column E 'TargetFieldName' is used to specify target account field name.
- Column F 'MatchWord' is used to specify the matching word in field Marker used to validate a transaction to move the field value from source to target.
- Column G 'FieldName' is used to specify the field name to be appended to the transaction.
- Column H 'FieldValue' is used to specify the field value to be appended to the transaction.
- Column I 'maybe more' is used to specify maybe more
| Sample: 'JnlAddByLink': |
| |
Description:
This is the second method to move a field data to a target field. The first method is to use the command 'JnlFormRepeat'. These 2 methods should be used exclusively. The column F specify a match word which should also be written in a record's Marker field so that to allow the record to be validated. Starting at column G pairs of field name and value can be attached. Empty pairs can be inserted too but all must be entered in pairs immediately one after another.
This is the second method to move a field data to a target field. The first method is to use the command 'JnlFormRepeat'. These 2 methods should be used exclusively. The column F specify a match word which should also be written in a record's Marker field so that to allow the record to be validated. Starting at column G pairs of field name and value can be attached. Empty pairs can be inserted too but all must be entered in pairs immediately one after another.
16. GroupSubTotalForChart
Fields:
| Column | What | Example |
| A | CommandName | GroupSubTotalForChart |
| B | AccountName | Checking |
| C | Group Field Name(s) | Year|Month |
| D | Value Field Name(s) | Plus|Minus |
| E | Flag | yes |
| F | AccountName | InventoryByQty |
| G | Title | Quantity Balance |
| H | Row number | 5 |
| I | Column number | 7 |
- Column A 'CommandName' is used to specify the command.
- Column B 'AccountName' is used to specify the account name.
- Column C 'Group Field Name(s)' is used to specify the field name(s) to group upon. The field names are seperated by a pipe '|'.
- Column D 'Value Field Name(s)' is used to specify the field name(s) to get total on group. The field names are seperated by a pipe '|'.
- Column E 'Flag' is used to specify a flag which holds a value either 'yes' or 'no'. 'yes' means to report the data set in sorting order of the Value Field Names. This is optional, the default is to sort on Group Field Names.
- Column F 'AccountName' is used to specify an account name whose sheet area will be used to report the grouping data. This is optional, by default the data is reported on the same sheet of the account name above.
- Column G 'Title' is used to specify an title of the report on the new sheet. This is optional.
- Column H 'Row number' is used to specify an integer number which is the starting row of the report on the new sheet. This is optional.
- Column I 'Column number' is used to specify an integer number which is the starting column of the report on the new sheet. This is optional.
| Sample: 'GroupSubTotalForChart': |
| |
Description:
The result of the group totals are appended at the bottom of the account in report or on a new sheet. User can utilize the Excel graph function to draw a picture.
The result of the group totals are appended at the bottom of the account in report or on a new sheet. User can utilize the Excel graph function to draw a picture.
17. SetInitValue
Fields:
| Column | What | Example |
| A | CommandName | SetInitValue |
| B | AccountName | BaChecking |
| C | FieldName | Balance |
| D | Value | 103.67 |
- Column A 'CommandName' is used to specify the command.
- Column B 'AccountName' is used to specify the account name.
- Column C 'FieldName' is used to specify the field name of a field at which an initial value will be set.
- Column D 'Value' is used to specify a value as an initial for the field.
| Sample: 'SetInitValue': |
| |
Description:
An accumulative field like 'Balance' is increasing by adding current net value to the previous value. So the very first previous value is called an initial value and user can set it with this command.
An accumulative field like 'Balance' is increasing by adding current net value to the previous value. So the very first previous value is called an initial value and user can set it with this command.
18. SetKeyField
Fields:
| Column | What | Example |
| A | CommandName | SetKeyField |
| B | AccountName | BaChecking |
| C | FieldName | Category |
- Column A 'CommandName' is used to specify the command.
- Column B 'AccountName' is used to specify the account name.
- Column C 'FieldName' is used to specify the field name of a field which will serve as a key. Or multiple field names separated by '|', like Category|Location.
| Sample: 'SetKeyField': |
| |
Description:
User can choose a field other than the Year Month Date and SeqNumber combination as a key. The records of an account in report will be sorted by the key. An account contains 2 types of fields. One is basic (primitive or journal) the other composite. The composite fields are the fields that depend on other fields through Fetch Calculation GetFrom or PullFrom. All fields that make up the key should not contain any of the composite fields.
User can choose a field other than the Year Month Date and SeqNumber combination as a key. The records of an account in report will be sorted by the key. An account contains 2 types of fields. One is basic (primitive or journal) the other composite. The composite fields are the fields that depend on other fields through Fetch Calculation GetFrom or PullFrom. All fields that make up the key should not contain any of the composite fields.
19. SetKeyField
Description:
The second sample with multiple key fields.
The second sample with multiple key fields.
| Sample: 'SetKeyField': |
| |
20. SetGroupField
Fields:
| Column | What | Example |
| A | CommandName | SetGroupField |
| B | AccountName | BaChecking |
| C | FieldName | Category |
- Column A 'CommandName' is used to specify the command.
- Column B 'AccountName' is used to specify the account name.
- Column C 'FieldName' is used to specify the field name of a field which will serve as a group key. Or multiple field names separated by '|', like Category|Location.
| Sample: 'SetGroupField': |
| |
Description:
The default group key filed is the Year Month Date and SeqNumber combination which is the same as the sorting key. User must use this command in order to use a different field as the grouping field. Note the sorting key and grouping key are 2 different functions.
The default group key filed is the Year Month Date and SeqNumber combination which is the same as the sorting key. User must use this command in order to use a different field as the grouping field. Note the sorting key and grouping key are 2 different functions.
21. SetOrderIndex
Fields:
| Column | What | Example |
| A | CommandName | SetOrderIndex |
| B | AccountName | DevElect |
| C | FieldName | Month |
| D | Value | 12 |
- Column A 'CommandName' is used to specify the command.
- Column B 'AccountName' is used to specify the account name.
- Column C 'FieldName' is used to specify the field name of a field which will assume a different index in order on report.
- Column D 'Value' is used to specify the value of an integer which serves as an index on which the fields are sorted on report.
| Sample: 'SetOrderIndex': |
| |
Description:
This command allows user to move a field of an account to a new position on report.
This command allows user to move a field of an account to a new position on report.
22. SetVisibility
Fields:
| Column | What | Example |
| A | CommandName | SetVisibility |
| B | AccountName | DevElect |
| C | FieldName | Month |
| D | Value | yes/no |
- Column A 'CommandName' is used to specify the command.
- Column B 'AccountName' is used to specify the account name.
- Column C 'FieldName' is used to specify the field name of a field which will be hidden on report.
- Column D 'Value' is used to specify the value of 'yes' or 'no'. 'yes' is to hind the field, 'no' is otherwise.
| Sample: 'SetVisibility': |
| |
Description:
This command allows user to hind a field of an account on report.
This command allows user to hind a field of an account on report.
23. SetOrientation
Fields:
| Column | What | Example |
| A | CommandName | SetOrientation |
| B | AccountName | TaxLine16 |
| C | Orientation | down |
- Column A 'CommandName' is used to specify the command.
- Column B 'AccountName' is used to specify the account name.
- Column C 'Orientation' is used to specify the orientation. This takes either 'down' or 'right'. 'right' is the default, and it means to print from left to right. 'down' means to print from top to bottom.
| Sample: 'SetOrientation': |
| |
Description:
Use this command when there are many columns and a few rows. This provides better readability.
Use this command when there are many columns and a few rows. This provides better readability.
24. SetOrientation
Fields:
| Column | What | Example |
| A | CommandName | SetOrientation |
| B | AccountName | TaxLine16 |
| C | Orientation | down |
- Column A 'CommandName' is used to specify the command.
- Column B 'AccountName' is used to specify the account name.
- Column C 'Orientation' is used to specify the orientation. This takes either 'down' or 'right'. 'right' is the default, and it means to print from left to right. 'down' means to print from top to bottom.
| Sample: 'SetOrientation': |
| |
Description:
Use this command when there are many columns and a few rows. This provides better readability.
Use this command when there are many columns and a few rows. This provides better readability.
25. SetKeyGroupFieldsPrint
Fields:
| Column | What | Example |
| A | CommandName | SetKeyGroupFieldsPrint |
| B | AccountName | DevElect |
| C | Value | yes/no |
| D | Value | 1 |
- Column A 'CommandName' is used to specify the command.
- Column B 'AccountName' is used to specify the account name.
- Column C 'Value' is used to specify the value of 'yes' or 'no'. 'yes' is to show the key and group fields on a row , 'no' is otherwise. The default is 'yes'.
- Column D 'Value' is used to specify the value of an integer which serves as a row number to show.
| Sample: 'SetKeyGroupFieldsPrint': |
| |
Description:
This command allows user to write the key and group field names of the account on a row specified.
This command allows user to write the key and group field names of the account on a row specified.
26. SetCalculationPrint
Fields:
| Column | What | Example |
| A | CommandName | SetCalculationPrint |
| B | AccountName | TaxLine16 |
| C | Flag | yes |
| D | Row | 5 |
- Column A 'CommandName' is used to specify the command.
- Column B 'AccountName' is used to specify the account name.
- Column C 'Flag' is used to specify the flag. This takes either 'yes' or 'no'. 'no' is the default, and it means not to print the analytic calculation formulas. 'yes' means the otherwise.
- Column D 'Row' is used to specify the row number. This takes an integer, an value 1 or beyong.
| Sample: 'SetCalculationPrint': |
| |
Description:
Use this command when wanting to see the formulas of each fields on the report. User can check the 'debug' box and the field dependencies will be printed in the log file.
Use this command when wanting to see the formulas of each fields on the report. User can check the 'debug' box and the field dependencies will be printed in the log file.
27. SetCalculationPrint
Fields:
| Column | What | Example |
| A | CommandName | SetCalculationPrint |
| B | AccountName | TaxLine16 |
| C | Flag | yes |
| D | Row | 5 |
- Column A 'CommandName' is used to specify the command.
- Column B 'AccountName' is used to specify the account name.
- Column C 'Flag' is used to specify the flag. This takes either 'yes' or 'no'. 'no' is the default, and it means not to print the analytic calculation formulas. 'yes' means the otherwise.
- Column D 'Row' is used to specify the row number. This takes an integer, an value 1 or beyong.
| Sample: 'SetCalculationPrint': |
| |
Description:
Use this command when wanting to see the formulas of each fields on the report. User can check the 'debug' box and the field dependencies will be printed in the log file.
Use this command when wanting to see the formulas of each fields on the report. User can check the 'debug' box and the field dependencies will be printed in the log file.
28. SetAccountReportStartRowColumn
Fields:
| Column | What | Example |
| A | CommandName | SetAccountReportStartRowColumn |
| B | AccountName | DevElect |
| C | Value | 7 |
| D | Value | 3 |
- Column A 'CommandName' is used to specify the command.
- Column B 'AccountName' is used to specify the account name.
- Column C 'Value' is used to specify the value of an integer which serves as a row number at which the account records start to be shown.
- Column D 'Value' is used to specify the value of an integer which serves as a column number at which the account records are to be shown starting.
| Sample: 'SetAccountReportStartRowColumn': |
| |
Description:
This command allows user to specify the starting row and column number the account records start to be shown.
This command allows user to specify the starting row and column number the account records start to be shown.
29. SetFieldIndexRow
Fields:
| Column | What | Example |
| A | CommandName | SetFieldIndexRow |
| B | AccountName | DevElect |
| C | Value | yes/no |
| D | Value | 1 |
- Column A 'CommandName' is used to specify the command.
- Column B 'AccountName' is used to specify the account name.
- Column C 'Value' is used to specify the value of 'yes' or 'no'. 'yes' is to show the index row , 'no' is otherwise.
- Column D 'Value' is used to specify the value of an integer which serves as a row number to show the index row.
| Sample: 'SetFieldIndexRow': |
| |
Description:
This command allows user to write the indexes assigned to fields on a row specified.
This command allows user to write the indexes assigned to fields on a row specified.
30. SetFieldNameRow
Fields:
| Column | What | Example |
| A | CommandName | SetFieldNameRow |
| B | AccountName | DevElect |
| C | Value | yes/no |
| D | Value | 2 |
- Column A 'CommandName' is used to specify the command.
- Column B 'AccountName' is used to specify the account name.
- Column C 'Value' is used to specify the value of 'yes' or 'no'. 'yes' is to show the field name row , 'no' is otherwise.
- Column D 'Value' is used to specify the value of an integer which serves as a row number to show the field name row.
| Sample: 'SetFieldNameRow': |
| |
Description:
This command allows user to write the field names on a row specified.
This command allows user to write the field names on a row specified.
31. SetColumnNumberRow
Fields:
| Column | What | Example |
| A | CommandName | SetColumnNumberRow |
| B | AccountName | DevElect |
| C | Value | yes/no |
| D | Value | 3 |
- Column A 'CommandName' is used to specify the command.
- Column B 'AccountName' is used to specify the account name.
- Column C 'Value' is used to specify the value of 'yes' or 'no'. 'yes' is to show the number row , 'no' is otherwise.
- Column D 'Value' is used to specify the value of an integer which serves as a row number to show the number row.
| Sample: 'SetColumnNumberRow': |
| |
Description:
This command allows user to write the number row which simply count and show integers from 1 to N where 1 is column A 2 is B etc.
This command allows user to write the number row which simply count and show integers from 1 to N where 1 is column A 2 is B etc.
32. SetInitialValueRow
Fields:
| Column | What | Example |
| A | CommandName | SetInitialValueRow |
| B | AccountName | DevElect |
| C | Value | yes/no |
| D | Value | 6 |
- Column A 'CommandName' is used to specify the command.
- Column B 'AccountName' is used to specify the account name.
- Column C 'Value' is used to specify the value of 'yes' or 'no'. 'yes' is to show the initial value , 'no' is otherwise.
- Column D 'Value' is used to specify the value of an integer which serves as a row number to show the initial value.
| Sample: 'SetInitialValueRow': |
| |
Description:
This command allows user to write the initial value onto a row on report. The column is decided by the field name the value is associated.
This command allows user to write the initial value onto a row on report. The column is decided by the field name the value is associated.
33. SetNavigationMenu
Fields:
| Column | What | Example |
| A | CommandName | SetNavigationMenu |
| B | AccountName | DevElect |
| C | Value | yes/no |
| D | Value | 5 |
| E | Value | 2 |
| F | Value | 5 |
| G | Value | yes/no |
| H | Value | yes/no |
- Column A 'CommandName' is used to specify the command.
- Column B 'AccountName' is used to specify the account name.
- Column C 'Value' is used to specify the value of 'yes' or 'no'. 'yes' is to write the navigational hyperlinks , 'no' is otherwise.
- Column D 'Value' is used to specify the value of an integer specifying starting row number.
- Column E 'Value' is used to specify the value of an integer specifying starting column number.
- Column F 'Value' is used to specify the value of an integer specifying the number of items per row.
- Column G 'Value' is used to specify the value of 'yes' or 'no'. 'yes' is to write the account's file name, sheet name and index as cell comment, 'no' is otherwise, and default.
- Column H 'Value' is used to specify the value of 'yes' or 'no'. 'yes' is to append an account list in alphabetic order (not index order), 'no' is otherwise, and default.
| Sample: 'SetNavigationMenu': |
| |
Description:
This command allows user to write the Sheet Navigational Hyperlinks on a specified account which could be viewed as a menu or a switch board.
This command allows user to write the Sheet Navigational Hyperlinks on a specified account which could be viewed as a menu or a switch board.
34. SetStartRowColumnForGSC
Fields:
| Column | What | Example |
| A | CommandName | SetStartRowColumnForGSC |
| B | Account | BaChecking |
| C | Row | 5 |
| D | Column | F |
- Column A 'CommandName' is used to specify the command.
- Column B 'Account' is used to specify the account name.
- Column C 'Row' is used to specify the row number starting at 1. For GSC, if it is within the same account, the row number is 2 row below the main report. This parameter is ignored. Otherwise the default number 7 is used.
- Column D 'Column' is used to specify the column letter or number starting at 1. This command allows user to move the cell block horizontally.
| Sample: 'SetStartRowColumnForGSC': |
| |
Description:
This command allows to move the block up and down left and right. The block is generated by commnad 'GroupSubTotalForChart'.
This command allows to move the block up and down left and right. The block is generated by commnad 'GroupSubTotalForChart'.
.
35. SetGroupFirstRowColor
Fields:
| Column | What | Example |
| A | CommandName | SetGroupFirstRowColor |
| B | AccountName | BaChecking |
| C | FieldName | Month |
| D | ColorName | Yellow |
- Column A 'CommandName' is used to specify the command.
- Column B 'AccountName' is used to specify the account name.
- Column C 'FieldName' is used to specify one or more of the field names used to mark the first row with a background color. Multiple field names are separated by a char pipe '|'.
- Column D 'ColorName' is used to specify the color name used to mark the first row in a group identified by the field above. The color names are listed at the end of this document.
| Sample: 'SetGroupFirstRowColor': |
| |
Description:
Marking the first row of groups makes account reading more productive.
Marking the first row of groups makes account reading more productive.
36. SetDefaultGroupFirstRowColor
Fields:
| Column | What | Example |
| A | CommandName | SetDefaultGroupFirstRowColor |
| B | AccountName | YhTSPL2035Detailx2 |
| C | ColorName | Yellow |
- Column A 'CommandName' is used to specify the command.
- Column B 'AccountName' is used to specify the account name.
- Column C 'ColorName' is used to specify the color name used to mark the first row in a group identified by the field above. The color names are listed at the end of this document.
| Sample: 'SetDefaultGroupFirstRowColor': |
| |
Description:
Marking the first row of groups makes account reading more productive. This command is different from SetGroupFirstRowColor in that the group names is not required since it uses the default or user-defined group names.
Marking the first row of groups makes account reading more productive. This command is different from SetGroupFirstRowColor in that the group names is not required since it uses the default or user-defined group names.
37. SetSelectedRow
Fields:
| Column | What | Example |
| A | CommandName | SetSelectedRow |
| B | AccountName | BaChecking |
| C | Method | Bottom |
| D | An integer | 8 |
- Column A 'CommandName' is used to specify the command.
- Column B 'AccountName' is used to specify the account name.
- Column C 'Method' is used to specify the method type. The type is either Top or Bottom.
- Column D 'An integer' is used to specify a integer value that is used to add to the Top row 1 or the Bottom row.
| Sample: 'SetSelectedRow': |
| |
Description:
Without this command a sheet is normally displayed from top. User can use this command to select another row for intial display. At cell C Top is for calculating the row number of a selected row which is away from row 1 plus the integer defined in cell D. If a negative integer is specified the selected row is at row 1. At cell C Bottom is for calculating the row number of a selected row which is away from bottom row plus the integer defined in cell D. Using a negative integer to select a row above bottom row. If the resulting row number is negative the selected row is at row 1.
Without this command a sheet is normally displayed from top. User can use this command to select another row for intial display. At cell C Top is for calculating the row number of a selected row which is away from row 1 plus the integer defined in cell D. If a negative integer is specified the selected row is at row 1. At cell C Bottom is for calculating the row number of a selected row which is away from bottom row plus the integer defined in cell D. Using a negative integer to select a row above bottom row. If the resulting row number is negative the selected row is at row 1.
38. SetFirstAccount
Fields:
| Column | What | Example |
| A | CommandName | SetFirstAccount |
| B | AccountName | BaChecking |
| C | Flag | yes |
- Column A 'CommandName' is used to specify the command.
- Column B 'AccountName' is used to specify the account name.
- Column C 'Flag' is used to specify the flag to indicate whether or not to write a HyperLink at Cell A1 of each other accounts. 'yes' means to wirte, 'no' means to not to write.
| Sample: 'SetFirstAccount': |
| |
Description:
When the report is brought up which sheet is to be displayed first? So use this command to specify. Also the flag allows user go back to the first (or main) account (or menu) by a HyperLink at each account's cell A1.
When the report is brought up which sheet is to be displayed first? So use this command to specify. Also the flag allows user go back to the first (or main) account (or menu) by a HyperLink at each account's cell A1.
39. SetBorderRight
Fields:
| Column | What | Example |
| A | CommandName | SetBorderRight |
| B | AccountName | MainMenu |
| C | Flag | yes |
- Column A 'CommandName' is used to specify the command.
- Column B 'AccountName' is used to specify the account name.
- Column C 'Flag' is used to specify the flag to indicate whether or not to write the rigth border of the account. 'yes' means to wirte, 'no' means to not to write. The default is to write.
| Sample: 'SetBorderRight': |
| |
Description:
The default is to write. User choose 'no' to remove the right border.
The default is to write. User choose 'no' to remove the right border.
40. SetBorderBottom
Fields:
| Column | What | Example |
| A | CommandName | SetBorderBottom |
| B | AccountName | MainMenu |
| C | Flag | yes |
- Column A 'CommandName' is used to specify the command.
- Column B 'AccountName' is used to specify the account name.
- Column C 'Flag' is used to specify the flag to indicate whether or not to write the bottom border of the account. 'yes' means to wirte, 'no' means to not to write. The default is to write.
| Sample: 'SetBorderBottom': |
| |
Description:
The default is to write. User choose 'no' to remove the bottom border.
The default is to write. User choose 'no' to remove the bottom border.
41. SetSortExemption
Fields:
| Column | What | Example |
| A | CommandName | SetSortExemption |
| B | AccountName | MainMenu |
| C | Flag | yes |
| D | Flag | yes |
- Column A 'CommandName' is used to specify the command.
- Column B 'AccountName' is used to specify the account name.
- Column C 'Flag' is used to specify the flag to indicate whether or not to exempt the account of being sorted at first pass before the calculation phase. 'yes' means to exempt, 'no' means otherwise. The default is 'no'.
- Column D 'Flag' is used to specify the flag to indicate whether or not to exempt the account of being sorted at second pass after the calculation phase. 'yes' means to exempt, 'no' means otherwise. The default is 'no'.
| Sample: 'SetSortExemption': |
| |
Description:
The sorting is time costing for an account that holds a large number of records. If an account records were added in the order of the sorting order intended already then the user could ask to exempt the sorting functions to save time.
The sorting is time costing for an account that holds a large number of records. If an account records were added in the order of the sorting order intended already then the user could ask to exempt the sorting functions to save time.
42. ActDiscardRowAt
Fields:
| Column | What | Example |
| A | CommandName | ActDiscardRowAt |
| B | OrderIndex | 4 |
| C | AccountName | DevElect |
| D | Conditional Expression | Net==0 |
- Column A 'CommandName' is used to specify the command.
- Column B 'OrderIndex' is used to specify an integer which serves as value on which all action commands are sorted and executed in order.
- Column C 'AccountName' is used to specify the account name.
- Column D 'Conditional Expression' is used to specify the conditional expression upon which the records are evaluated to be descarded or not.
| Sample: 'ActDiscardRowAt': |
| |
Description:
This command allows user to specify whether to skip a record if the conditional expression is true. For example if the calculation 'Net==0' is true the record is not shown on report (discarded). Refer Conditional Expression above.
This command allows user to specify whether to skip a record if the conditional expression is true. For example if the calculation 'Net==0' is true the record is not shown on report (discarded). Refer Conditional Expression above.
43. ActBcDiscardRowAt
| Sample: 'ActBcDiscardRowAt': |
| |
Description:
This command has exact same effects of the command ActDiscardRowAt except it is to be executed before the data transfer and math calculation.
This command has exact same effects of the command ActDiscardRowAt except it is to be executed before the data transfer and math calculation.
44. ActCopyAccount
Fields:
| Column | What | Example |
| A | CommandName | ActCopyAccount |
| B | OrderIndex | 4 |
| C | SourceAccountName | BaChecking |
| D | TargetAccountName | BaCheckingByCategory |
| E | Conditional Expression | FieldName> 100 |
- Column A 'CommandName' is used to specify the command.
- Column B 'OrderIndex' is used to specify an integer which serves as value on which all action commands are sorted and executed in order.
- Column C 'SourceAccountName' is used to specify the source account name of the account from which to copy data to target account.
- Column D 'TargetAccountName' is used to specify the target account name of the account to which to copy data from a source account.
- Column E 'Conditional Expression' is used to specify how to pick records. This cell is optional. Leave it blank for all records. See example below and the definition of Conditional Expression above.
| Sample: 'ActCopyAccount': |
| |
Description:
This command simply copies an account records to another. The order index indicates all action commands are executed in order by the index.
This command simply copies an account records to another. The order index indicates all action commands are executed in order by the index.
45. ActCopyAccount
Description:
The second sample with record-picking conditional expression
The second sample with record-picking conditional expression
| Sample: 'ActCopyAccount': |
| |
46. ActCopyAccount
Description:
The third sample with record-picking conditional expression
The third sample with record-picking conditional expression
| Sample: 'ActCopyAccount': |
| |
47. ActBcCopyAccount
| Sample: 'ActBcCopyAccount': |
| |
Description:
This command has exact same effects of the command ActCopyAccount except it is to be executed before the data transfer and math calculation.
This command has exact same effects of the command ActCopyAccount except it is to be executed before the data transfer and math calculation.
48. ActJoinAccounts
Fields:
| Column | What | Example |
| A | CommandName | ActJoinAccounts |
| B | OrderIndex | 16 |
| C | SourceAccountName | BaChecking |
| D | SourceAccountName | BaSavings |
| E | TargetAccountName | BaCheckingSavingsJoined |
| F | KeyFieldNames | Category|Net |
| G | JoinTypes | yours|mm |
| H | FieldControls | BaChecking|Minus|none#BaChecking|Plus|Credit |
- Column A 'CommandName' is used to specify the command.
- Column B 'OrderIndex' is used to specify an integer which serves as value on which all action commands are sorted and executed in order.
- Column C 'SourceAccountName' is used to specify the account name of the first source account from which the records are joined with the second account into a traget account.
- Column D 'SourceAccountName' is used to specify the account name of the second source account from which the records are joined with the first account into a traget account.
- Column E 'TargetAccountName' is used to specify the account name of the target account into which the 2 source accouts are joined.
- Column F 'KeyFieldNames' is used to specify the key field names of both source accounts.
- Column G 'JoinTypes' is used to specify the types of joinning methods.
- Column H 'FieldControls' is used to specify Additional rules to deal with other fields.
| Sample: 'ActJoinAccounts': |
| |
Description:
This command joins 2 source accounts into 1 target account.
This command joins 2 source accounts into 1 target account.
Key Fields:
The key fields are used to join records. If multiple fields were to be used use '|' to separate the field's names. All accounts must have the same key fields.
The key fields are used to join records. If multiple fields were to be used use '|' to separate the field's names. All accounts must have the same key fields.
Join Types:
The first type is 'mine'. The second type is 'yours'. The third type is 'mm m1 1m'. The adoption of word 'mine' and 'yours' is derived from a metaphor which is saying that the user is the owner of the first account of 'mine' and he is trying to join the first account to the second account which is owned by a second person of 'yours' .
'mine' means the records are of first account and have no match from second account. 'yours' means the records are of second account and have no match from first account.
The third type is 'mm m1 1m'. This type means the records are matching from both source accounts.
'mm' means 'many to many' and the matched records are joined completely. For example if there are 2 records from first account and 3 records from second account that they share same key value there will be 6 joined records in the traget account.
'm1' means 'many to 1' and the matched records are joined partially. For example if there are 2 records from first account and 3 records from second account that they share same key value there will only be 2 joined records in the traget account 2 from first account and 1 from second account.
'1m' means '1 to many' and the matched records are joined partially. For example if there are 2 records from first account and 3 records from second account that they share same key value there will only be 3 joined records in the traget account 1 from first account and 3 from second account.
mm' 'm1' and '1m' are mutually exclusive meaning only one can be used at a time. So 'mine' 'yours' and one of the 'mm' 'm1' and '1m' can be used together using a seperator '|' for example 'your|m1' or 'mine|1m' etc.
FieldControls:
Without the additional FieldControls the default function is to move data from a source field to a matching target field. All source fields that are not in the target account are abandoned.
The rule is written in format 'account|field|field' or 'account|field|none'. The format has 3 strings. The first string is the account name. The second string is a field from the account of first string. The third string is either the reserved word 'none' or a target field name. The word 'none' indicates the field from the first string account will not participate in the 'join'. A target field name indicates the field from the first string account will be joined over to the target field (renamed).
Multiple rules are concatenated using the seperator char '#'.
More Illustration:
49. ActBcJoinAccounts
| Sample: 'ActBcJoinAccounts': |
| |
Description:
This command has exact same effects of the command ActJoinAccounts except it is to be executed before the data transfer and math calculation.
This command has exact same effects of the command ActJoinAccounts except it is to be executed before the data transfer and math calculation.
50. ActRemoveDuplicates
Fields:
| Column | What | Example |
| A | CommandName | ActRemoveDuplicates |
| B | OrderIndex | 4 |
| C | AccountName | DevElect |
| D | Key fields | FieldName1:String|FieldName2:double |
- Column A 'CommandName' is used to specify the command.
- Column B 'OrderIndex' is used to specify an integer on which all action commands are sorted and executed in order.
- Column C 'AccountName' is used to specify the account name.
- Column D 'Key fields' is used to specify the key fields upon which the records are sorted and checked upon for duplicates.
| Sample: 'ActRemoveDuplicates': |
| |
Description:
This command allows user to sort the account and then thus render a function to remove duplicate rows that have the same values in the specified fields. The syntax is the same as the command ActSortAccount.
This command allows user to sort the account and then thus render a function to remove duplicate rows that have the same values in the specified fields. The syntax is the same as the command ActSortAccount.
51. ActBcRemoveDuplicates
| Sample: 'ActBcRemoveDuplicates': |
| |
Description:
This command has exact same effects of the command ActRemoveDuplicates except it is to be executed before the data transfer and math calculation.
This command has exact same effects of the command ActRemoveDuplicates except it is to be executed before the data transfer and math calculation.
52. ActSortAccount
Fields:
| Column | What | Example |
| A | CommandName | ActSortAccount |
| B | OrderIndex | 4 |
| C | AccountName | DevElect |
| D | Key fields | FieldName1:String|FieldName2:Double |
- Column A 'CommandName' is used to specify the command.
- Column B 'OrderIndex' is used to specify an integer which serves as value on which all action commands are sorted and executed in order.
- Column C 'AccountName' is used to specify the account name.
- Column D 'Key fields' is used to specify the key fields upon which the records are sorted.
| Sample: 'ActSortAccount': |
| |
Description:
This command allows user to sort the account in a different way. The key fields are separated by pipe. For each field user can append a colon ':' and either String or Double as in example above. This allows the sorting algorithm to compare by string or by double value.
This command allows user to sort the account in a different way. The key fields are separated by pipe. For each field user can append a colon ':' and either String or Double as in example above. This allows the sorting algorithm to compare by string or by double value.
53. ActBcSortAccount
| Sample: 'ActBcSortAccount': |
| |
Description:
This command has exact same effects of the command ActSortAccount except it is to be executed before the data transfer and math calculation.
This command has exact same effects of the command ActSortAccount except it is to be executed before the data transfer and math calculation.
54. ActBcWriteGroupSubtotalForChart
| Sample: 'ActBcWriteGroupSubtotalForChart': |
| |
Description:
This command has exact same effects of the command ActWriteGroupSubtotalForChart except it is to be executed before the data transfer and math calculation.
This command has exact same effects of the command ActWriteGroupSubtotalForChart except it is to be executed before the data transfer and math calculation.
55. OneFileCopy
Fields:
| Column | What | Example |
| A | CommandName | OneFileCopy |
| B | DirectoryName | OneFile |
| C | Flag | yes |
- Column A 'CommandName' is used to specify the command.
- Column B 'DirectoryName' is used to specify the directory name.
- Column C 'Flag' is used to specify the flag of indicating whether or not to delete the existing directory. The value is either 'yes' or 'no'.
| Sample: 'OneFileCopy': |
| |
Description:
This command will copy the OneFile to the directory and the file name is added and prefixed by 'eat-'. Note the directory should be in test thus temporary. It should not hold any permanent valuable files. This command makes it convenient for user to test the OneFile model. The OneFile model is a equivalent model to a source model. It was created by assembling all input commands of the source model and inject into the OneFile model.
This command will copy the OneFile to the directory and the file name is added and prefixed by 'eat-'. Note the directory should be in test thus temporary. It should not hold any permanent valuable files. This command makes it convenient for user to test the OneFile model. The OneFile model is a equivalent model to a source model. It was created by assembling all input commands of the source model and inject into the OneFile model.
56. PrepareCycle
Fields:
| Column | What | Example |
| A | CommandName | PrepareCycle |
| B | SheetName | Cycle2023May |
| C | SheetName | Cycle2023June |
| D | CommandNames | Axdd|AxddRecord |
| E | First of the Pair of Type 1 | column|f |
| F | Second of the Pair of Type 1 | value|empty |
| G | First of the Pair of Type 2 | field|PreviousBalance |
| H | Second of the Pair of Type 2 | fieldValue|NewBalance |
- Column A 'CommandName' is used to specify the command.
- Column B 'SheetName' is used to specify the sheet name of a sheet which is based to copy from as source.
- Column C 'SheetName' is used to specify the sheet name of a sheet which is to be created by copying a source sheet intoi it.
- Column D 'CommandNames' is used to specify command names of the commands of which their fields are to be modified based on the formulas in pairs that follow.
- Column E 'First of the Pair of Type 1' is used to specify the formula which consists 2 strings seperated by |. The first is reserved name 'column' which indicates the second is a column letter like 'f' etc.
- Column F 'Second of the Pair of Type 1' is used to specify the formula which consists 2 strings seperated by |. The first is reserved name 'value' which indicates the second is a pure value. The string 'empty' indicates nothing in value.
- Column G 'First of the Pair of Type 2' is used to specify the formula which consists 2 strings seperated by |. The first is reserved name 'field' which indicates the second is a field defined in 'type'. The field is to be updated from the second of the pair.
- Column H 'Second of the Pair of Type 2' is used to specify the formula which consists 2 strings seperated by |. The first is reserved name 'filedvalue' which indicates the second is also a field name. This field is pulled from its value and the value is updated to the field defined in the first of the pair.
| Sample: 'PrepareCycle': |
| |
Description:
This command will create a new cycle sheet for a new cycle. The new cycle sheet will most inherits the previous cycle values except the updates made through the formulas. This enables the next cycle forecasting very effectively. The formula pairs are to be placed starting at cell E. Empty pairs can be placed in between. They must be appearing in pairs. There is a UI CheckBox on page Model. User can disable the generation of the new cycle sheet even though the command is present as input.
This command will create a new cycle sheet for a new cycle. The new cycle sheet will most inherits the previous cycle values except the updates made through the formulas. This enables the next cycle forecasting very effectively. The formula pairs are to be placed starting at cell E. Empty pairs can be placed in between. They must be appearing in pairs. There is a UI CheckBox on page Model. User can disable the generation of the new cycle sheet even though the command is present as input.
K. The dll commands
1. DllEat
Fields:
| Column | What | Example |
| A | CommandName | DllEat |
| B | DllFileName | codeSnippet.dll |
| C | NameSpace | CodeSnippet |
| D | ClassName | Class1 |
| E | MethodName | writeCodeSnippet |
| F | SheetName | CodeSpippet |
| G | AccountName | BaChecking |
| H | Extra data 1 | data1 |
| I | Extra data 2 | data2 |
| J | Extra data 3 | data3 |
- Column A 'CommandName' is used to specify the command.
- Column B 'DllFileName' is used to specify the dll file name with extension.
- Column C 'NameSpace' is used to specify the NameSpace name in the dll project.
- Column D 'ClassName' is used to specify the class name within the NameSpace.
- Column E 'MethodName' is used to specify the method name to which the main program EatUi.exe will calll. Copy the method prototype from below.
- Column F 'SheetName' is used to specify the sheet name.
- Column G 'AccountName' is used to specify the account name. User can place more than 1 account names here , the names are separated by a string '[0]'. For each account, user can add a condition expression after the account name and a separator string '[1]'. Here is an example 'AccountName1[1]fieldName==aValue[0]AccountName2[1]fieldName2==aValue2'. If they are multiple account names, the multiple method prototype is used instead of the single one. Refer to below for the second prototype.
- Column H 'Extra data 1' is used to specify the additional data at user‘s disposal, optional.
- Column I 'Extra data 2' is used to specify the additional data at user‘s disposal, optional.
- Column J 'Extra data 3' is used to specify the additional data at user‘s disposal, optional. No limit is set for how many data row to follow.
| Sample: 'DllEat': |
| |
Description:
Please copy the method prototype to build a dll project. The returned array will be presented in a sheet named in field F. 3 dll app code files are presented as example below. When creating a dll project in Visual Studio 2022 use the project type 'Class Library (.NET Framework)'. The dll function includes a delegate function at the end. User can call it to get more data. This delegate function is defined in a dll named EatUserDllExtension. User must includes it as a reference in project. The delegate name is AskForMore.
Please copy the method prototype to build a dll project. The returned array will be presented in a sheet named in field F. 3 dll app code files are presented as example below. When creating a dll project in Visual Studio 2022 use the project type 'Class Library (.NET Framework)'. The dll function includes a delegate function at the end. User can call it to get more data. This delegate function is defined in a dll named EatUserDllExtension. User must includes it as a reference in project. The delegate name is AskForMore.
| Dll Sample Code for Command DllEat: |
|
|
| Dll Support Library: |
|
|
2. DllEat
Description:
The second sample with a condition.
The second sample with a condition.
| Sample: 'DllEat': |
| |
| Dll Sample Code 2 for Command DllEat: |
|
|
| Dll Support Library: |
|
|
3. DllEat
Description:
The third sample rendering multiple accounts
The third sample rendering multiple accounts
| Sample: 'DllEat': |
| |
| Dll Sample Code 3 for Command DllEat: |
|
|
| Dll Support Library: |
|
|
L. Credit card accounts
1. General
Simply download CSV monthly statement files to the directory defined by command 'scanbank' in Model. We avoided to use a PDF product to interpret PDF statements so that we could save for customers. The CSV files are working fine.
2. Supported Bank Websites
| Card Name | Bank Name | Web Site |
| Costco | citi | citi.com |
| N/A | Chase | chase.com |
| TJX | Synchrony | tjx.syf.com |
| Homedepot | N/A | homedepot.com |
| Lowes | N/A | https://www.lowes.com/u/login |
| Macys | N/A | https://www.macys.com/account/signin |
| N/A | CapitalOne | CapitalOne.com |
| Checking | Bank of America | bankofamerica.com |
| Savings | Bank of America | bankofamerica.com |
| Home Equity | Bank of America | bankofamerica.com |
| US Bank | US Bank | https://onlinebanking.usbank.com/ |
| figure 3571 | ||
3. CSV Map file
On Model page in the master program EatUi.exe, there is an entry for the map file. We supply the file and it works for the major bank credit card companies listed above. We recommend user don't change this file because it is too complicated to change. If a user has a CSV statement for a company other than the ones listed, we will add the map sheet for the user for free to support his or her cause.
4. Bank file names
In the map file, each sheet represent a statement. The sheet name must conform to such a format that there are 4 strings seperated by hyphone '-'. The first string must be 'sheet', second string is the bank name. The third string is the accoune name, usually the account's last 4 digits. And the last string is the file's extention which is 'csv'. So for example, if a user have 2 Capital accounts with last 4 '1234' and '5678', the sheet name will be 'sheet-capital-1234-csv' and 'sheet-capital-5678-csv', and the file names of the bank files downloaded should be renamed as 'capital-1234-20230901.csv' and 'capital-5678-20230901.csv'. All sheet content remains intact. For more than 1 statemnets, the second and beyond are just copies of the first one.
M. Move Data Between Accounts
1. General
The strength of this tool is its capability to move data between accounts effectively.
2. The 2 Formulas
There are 2 formulas 'GetFrom' and 'PullFrom'. 'GetFrom' scans the target account records and return the data at first encounter on the condition. 'PullFrom' scans the target account records and return the data at last encounter on the condition.
3. Syntax and Action
Note: any phrase that starts with 'FieldName' means it is a field name defined in the account's type by command DfnType. any phrase that starts with 'Value' means it is a constant value. In general, a formula has 3 ot 4 phrases. The 1st is the formula name. The 2nd is the target account name. The third is the target field name. The 4th is a part of or the entire lookup condition.
| Type | Syntax | Lookup Action | Speed |
| KeyToKey | GetFrom|Account|Field | This foemula is missing the 4th phrase. This means it will compare the source record key with the target record key. | fast |
| StaticKeyToKey | GetFrom|Account|Field|2023.11.09.1234 or GetFrom|Account|Field|key:2023.11.09.1234 | This formula will compare the key at 4th phrase with the target record key. If the 4th phrase is further divided by colon, and has 2 subphrases, then the 2nd subphrase is used in the comparism. | fast |
| OneOfFieldValues | GetFrom|Account|Field|Any:FieldName1:Value1,[FieldName2],FieldName3 | This formula's 4th phrase must have 3 subphrases divided by colon. The 1st subphrase must be 'Any', The 2nd sunphrase is the target field name. The third subphrase is 1 or more subsubphrases divided by comma. If the field name is bracketed by [], the field name is located in the source account and its value is used to replace the bracketed field name. This formula's action is to check if one of the subsubphrases is part of the target field value. If yes, return true. | slow |
| OneOfFieldValues | GetFrom|Account|Field|Integer:FieldName1:Value1 | This formula is almost the same as the one above. It differs in the evalution. This compares the Value1 with the full content of the target field as integer. If yes, return true. | fast |
| OneOfFieldValues | GetFrom|Account|Field|Double:FieldName1:Value1 | This formula is almost the same as the one above. It differs in the evalution. This compares the Value1 with the full content of the target field as Double. If yes, return true. | fast |
| OneOfFieldValues | GetFrom|Account|Field|String:FieldName1:Value1 | This formula is almost the same as the one above. It differs in the evalution. This compares the Value1 with the full content of the target field as String. If yes, return true. | fast |
| LogicExpression | GetFrom|Account|Field|Logic:[FieldName1]>Value1 && [FieldName1] < FieldName3 | This formula's 4th phrase must have 2 subphrases divided by colon. The 1st subphrase must be 'Logic', The 2nd sunphrase is a logic expresion. the target If the field name is bracketed by [], the field name is located in the source account and its value is used to replace the bracketed field name. This formula's action is to evaluate the logic expresion. | slow |
N. Analyze the reports
1. General
The reports are just showing each accounts in Excel sheet. The order of the sheets is the order defined in a argument of all the command 'account'. Each sheet will list all transactions in the order of the key, usualy the combination of the fields 'year', 'month', 'date' and 'SeqNumber'.
2. The total
Each user could have the Model set up such that the financial total is calculated in the total account. The total account is the top tier account that contains transactions that aggregate the end balances from several other lower tier accounts, and which in turn could aggregate from further other lower tier accounts. For example, the 'Total' account is a sum of the end balance from 'Cash', 'Investment' and 'Liability'. And The 'Cash' account is a sum of the end balance from 'Checking' and 'Savings' , etc.
3. The style
Each sheet could be tuned to certain style. On the Model page in EatUi.exe, there is an entry for the style template file. This file contains the sheets that the names of the sheets match the account names, and then the sheets provide a base for the accounts to be written upon.
4. The Archive
The report file is named with date and model name. The file can be archived into the directory 'Archive'. The files in 'Archive' will not be deleted when user performs a 'clean' function which deletes files in directory 'rpt', 'log' and 'Copy' beyong the allowed number of files to keep.
5. Web Page Report
When user checked the CheckBox 'as Web Page' , and an equivalent report file is generated in the format of HTML. This report only selects the columns between Collumn 'DateSeqAsKey' and 'LastField'. So user should add the field 'LastField' and arrange the account fields in an order that user prefer.
O. Analyze the data
1. Group Transactions
The command 'groupSubtotalForChart' can group an account transactions and calculate the group's totals, and show the data at the end of the account report.
2. Filter & Group Transactions
Other than the command 'groupSubtotalForChart', there are 4 other commands that can move transactions to a new account. The movement can be customized with filters and groups to produce a subset of or aggregated set of transations, for analysis purposes. These commands are 'copyAccount', 'copyMatched', 'copyMismatched' and 'joinAccounts'. Refer to each commands for user's purpose.
P. Prepare next cycle
1. General
For a user, monthly recurrence of payments and reconciliation of bank accounts are mandatory or smart task. User use a cycle sheet to describe all entry forms for a cycle. When entering next cycle, the forms in the next one are exactly the same, or otherwise the model is not smart due to requiring user to constantly change the forms. The smart way is that user only need to enter the data in the form assuming the cell had been background-color-highlighted. For example, just replace the payment amount, from $40.03 to $45.32, etc. This EAT tool provides a command to copy the very last cycle sheet to a new cycle sheet with styles intact. The command can change some of the field values in the new sheet. Following 3 items are recommended to be changed for the new cycle sheet.
- clear the Status field. The Status field is to flag if a record is entered and thus updated. When all is flagged, it is time to reconcile the new cycle.
- replace a new month number, and maybe year number.
- move a field data to another. For example, move 'currentBalance' to 'previousBalance', because a formula could calculate a new balance based on previous balance. This is true for Mortgage Balance and Escrow Balance.
Q. Create one book
1. General
All bank files are translated into the input commands. All manual input commands plus all bank input commands can be consolidated into one Excel book. In turn this one book can be fed as an input file in a model. The result generated by this new One Book should be identical to the result by the ones in user's model. User could refer to this One Book and examine as a good exercise. There is no command for this function. Only use a CheckBox of 'create one book' on page Model of EatUi.exe to carry out this task. If unchecked, the function is disabled. The new One Book file is saved as its own Excel file. User could move it to a new model to test out, just for fun if there is no other practical reasons.
R. Shorten the cycles
1. General
User may already has 4 years of data in input sheets. He is no longer concerned about the history data more than 1 year ago, want to remove them.
2. Step 1
He can remove the history cycle sheets by either renaming them with a prefix 'x' or simply remove the cycle sheets, and remove the bank directory from the model. This assumes that the cycle sheet only contains the cycle commands (Add and AddRecord commands for their cycle), not commands like 'type', 'account' and other generic commands.
3. Step 2
But that is not enough because what about the starting balances for all accounts? That means user has to come up with a set of initial values for the commnad 'setInitValue' for each accounts. Fortunately on the page Model of EatUi.exe there is an entry of 'create init commands', user can provide the Month, Date and Year as 'CutOffDate' for which the balance values are used to generate a set of commands of 'setInitValue'. This set of commands can replace the old ones. So by doing this 2 steps of task, user can reduce the number of cycles being considered in the accounting.
S. Back up
1. Purpose

All files reside on the same disk drive. If the disk drive is no longer functioning, all financial data files are lost. The solution is to backup the files to another USB or network drive.
2. Backup a Must
Purchase a portable USB drive for backup purpose. Plug the drive to a USB port. Backup after you have made changes to the system, usually at the end of day. Once the backup is finished, then proceed to shut down the PC.
3. How to
In Eat Manager, go to page Backup, click the bottom buttons to back up either to a drive or to a directory.
4. Method
This backup command only backs up the files that have the file dates newer than the ones on destination drive, avoiding waste of time on copying unnecessarily the files that have the same contents as that of the destination ones.
T. Update EAT
1. Download zip File
EAT update is free from charge. An owner of EAT can download the new version at www.excelaccountingtool.com/EatDownLoadV2Two/EatUpdate, provided the owner had logged in.
2. Unzip File
Unzip the downloaded zip file, put in the Installation Full Path (IFP) in 'This Folder' and choose 'Replace the files in the destination'.
3. License File
The new updated version works on the existing license file, which was untouched during the update and continues to work through out its term.
U. Definitions & Practices
1. Color Names
AliceBlue, AntiqueWhite, Aqua, Aquamarine, Azure, Beige, Bisque, Black, BlanchedAlmond, Blue, BlueViolet, Brown, BurlyWood, CadetBlue, Chartreuse, Chocolate, Coral, CornflowerBlue, Cornsilk, Crimson, Cyan, DarkBlue, DarkCyan, DarkGoldenrod, DarkGray, DarkGreen, DarkKhaki, DarkMagenta, DarkOliveGreen, DarkOrange, DarkOrchid, DarkRed, DarkSalmon, DarkSeaGreen, DarkSlateBlue, DarkSlateGray, DarkTurquoise, DarkViolet, DeepPink, DeepSkyBlue, DimGray, DodgerBlue, Firebrick, FloralWhite, ForestGreen, Fuchsia, Gainsboro, GhostWhite, Gold, Goldenrod, Gray, Green, GreenYellow, Honeydew, HotPink, IndianRed, Indigo, Ivory, Khaki, Lavender, LavenderBlush, LawnGreen, LemonChiffon, LightBlue, LightCoral, LightCyan, LightGoldenrodYellow, LightGray, LightGreen, LightPink, LightSalmon, LightSeaGreen, LightSkyBlue, LightSlateGray, LightSteelBlue, LightYellow, Lime, LimeGreen, Linen, Magenta, Maroon, MediumAquamarine, MediumBlue, MediumOrchid, MediumPurple, MediumSeaGreen, MediumSlateBlue, MediumSpringGreen, MediumTurquoise, MediumVioletRed, MidnightBlue, MintCream, MistyRose, Moccasin, NavajoWhite, Navy, OldLace, Olive, OliveDrab, Orange, OrangeRed, Orchid, PaleGoldenrod, PaleGreen, PaleTurquoise, PaleVioletRed, PapayaWhip, PeachPuff, Peru, Pink, Plum, PowderBlue, Purple, Red, RosyBrown, RoyalBlue, SaddleBrown, Salmon, SandyBrown, SeaGreen, SeaShell, Sienna, Silver, SkyBlue, SlateBlue, SlateGray, Snow, SpringGreen, SteelBlue, Tan, Teal, Thistle, Tomato, Transparent, Turquoise, Violet, Wheat, White, WhiteSmoke, Yellow, YellowGreen
2. Names Case
All names like sheet's, type's, account's, etc are case insensitive.
3. Word Search
If a word definition is not clear, try to search entire document for the word. It may exits somewhere else that could clear user's confusion.
V. History of changes
1. The changes
| Date | Description |
| 07/15/2021v3.1 | adjust User Manual. |
| 07/20/2021v3.1 | ENV Commands: modified how to define the command strings for Excel and Text editors. The new way is simpler and the user just write out an entire string with none case-sensitive 'XXX' which is to be replaced with the target file name. |
| 07/20/2021v3.1 | Trial Period: modified the trial term period to be 3 month. |
| 08/13/2021v3.1 | Concatenate the Calculation strings with separator Comma instead of '/r' to avoid not being displayed in LibreOffice in sheet Main_MathMap. |
| 08/14/2021v3.2 | Remove error warning bell sound. |
| 08/14/2021v3.2 | log as an error when capacity limits are reached. |
| 08/22/2021v3.3 | Add Excel Macro-enabled file extension XLSM file as input file. |
| 08/23/2021v3.3 | Change command 'setKeyField' to set none-standard key in multiple fields. |
| 08/28/2021v3.3 | Add a command 'CopyAccount' to copy records from one account to another. |
| 09/07/2021v3.3 | Add a command 'CopyAccountOnFilter' to copy and also filter records from one account to another. |
| 09/14/2021v3.3 | Add a default field 'Marker' for every account. This field holds the value 'good here' or 'reset|FieldName1:0.0|FieldName2:0.0'. See 'Marker' for more information. |
| 09/15/2021v3.3 | Add a mode of entering header and values separately, the Compact Mode. |
| 09/16/2021v3.3 | Add 2 default fields 'Description' and 'Status' for every account. These 2 fields are so useful and important that we might just add them as default for conveniences. |
| 10/06/2021v3.3 | Allow calculation formula accepts constants like '3.0' in 'Amount|c=Share*3.0'. |
| 10/06/2021v3.3 | Since computer double calculation is not accurate and the near zero result is expressed in 'Natural Exponential Function', the value less than 0.03 is presented as 0 to avoid confusion. |
| 10/08/2021v3.3 | change CopyAccountOnFilter to CopyAccountOnIncFilter and add CopyAccountOnExcFilter command. |
| 10/12/2021v3.3 | change CopyAccount, CopyAccountOnIncFilter and CopyAccountOnExcFilter commands to have a 'Order Number' field which serves as an order in which the commands are executed. |
| 10/19/2021v3.3 | Add Repeat and RepeatRecord commands. These 2 commands are primarily used for records that have a link field 'GetFrom' and its 'Year' field is 'Link' so that user don't have to enter them in each sheets. The 2 new commands are duplicated into sheets prefixed by 'Cycle' in name. |
| 10/25/2021v3.3 | Add inclusion of 'a template file' for report. Refer to section 'Report templates' for more information. |
| 10/26/2021v3.3 | Add few other formatting commands for report. Refer to section 'Report formatting commands' for more information. |
| 11/10/2021v3.3 | Add process to create reports on Credit Card statements from 5 banks. More banks will be added in the future. |
| 01/01/2022v4.1 | Add Capital and USBank Credit card PDF statement processing. Finished a better coding strategy for PDF Statement processing. |
| 01/09/2022v4.1 | Made a minor revision for Command 'groupSubtotalForChart'. The revision is to allow the command to handle zero values for the totaling fields. |
| 01/15/2022v4.1 | Added a Prelude file as Excel format that defined additional parameters. One parameter is the 'Scan' command which defines a directory in cell 2. User can define multiple 'Scan' command to define multiple directories. The other is a command called 'setDebugMode' which set the debug flag on and off. When it is on, many statistical data are written into the log file for analysis. |
| 02/04/2022v4.1 | Enhanced the log report in Notepad++, which utilizes the collapsing #region #endregion region. Added a 'Debug mode' for log report. |
| 02/08/2022v4.1 | Enhanced the field calculation formula to use left and right brackets '(' and ')' in the 'Type' definition. For example, user can use FieldName|c=Field3*(field4+45) |
| 03/07/2022v3.1 | Removed ENV Command ExcelEditor and TextEditor: We learned Windows provides default programs to open files. So those parameters are removed. User should go to Windows Default Program to assign desired programs to open Excel and Text files. |
| 03/15/2022v4.1 | Completed the code logic to handle bank CSV files, and removed the code handling bank PDF files due to the license requirement. |
| 04/25/2022v4.1 | Added a log entry for version limit controls. |
| 04/28/2022v4.1 | Added a report formating commnad 'writeNavigationColumn'. |
| 04/28/2022v4.1 | Changed CSV bank directory from signular and static to multiple and configurable in parameter file using the command 'scanBank'. |
| 04/29/2022v4.1 | Added Dialog form key Enter and ESC responses. |
| 04/30/2022v4.1 | Integrated the location limit for both manual and bank auto directories. |
| 05/01/2022v4.1 | Adjusted source code to its optimum consolidated object structure. |
| 07/18/2022v4.1 | Changed command 'CopyAccountOnExcFilter' to 'CopyAccountOnExcFilter'. |
| 07/18/2022v4.1 | Changed command 'CopyAccountOnIncFilter' to 'CopyAccountOnIncFilter'. |
| 08/15/2022v4.3 | Fixed a bug of Pointer error caused by missing description field in Command 'account'. |
| 09/02/2022v4.2 | Added an 'Instructiona and notes' page in Eat Manager to allow user to enter self-guiding instructions and notes for each model. |
| 09/02/2022v4.3 | Fixed a mistake that the Hyper Link was written to a record of zero value, which then was removed from report. |
| 09/17/2022v4.3 | Added a function of removing the customer download zip files for the sake of saving disk space. |
| 09/17/2022v4.3 | Added a few of table fields to store data about the customer download files. |
| 10/25/2022v4.4 | Created auto ordering process on the math steps to eliminate the need of user manually specifying the math steps. |
| 11/20/2022v4.4 | Integrated the hierarchy view of any dependencies. |
| 02/04/2023v5.0 | Created a new Object Programming Framework, and applied the entire program source codes to the framework. |
| 02/05/2023v5.0 | Finished moving the entire program source codes to WinForm GUI. |
| 03/05/2023v5.0 | Finished deployment of the project separate from Teknewell CS OOP Framework product. |
| 04/27/2023v5.0 | Examined the correctness of the math calculation algorithm. |
| 02/27/2024v5.1 | Added Conditional Expression. Its purpose is to evaluate a record for further processing. |
| 03/06/2024v5.1 | Completed log entries in entirety. |
| 03/07/2024v5.1 | Revised help argument. |
| 03/08/2024v5.1 | Added auot back up function. |
| 03/08/2024v5.2 | Upgrated to version v5.2. |
| 03/14/2024v5.2 | Optimized Excel read and write class family. |
| 03/27/2024v5.2 | Optimized WinForm main and sub threads. |
| 04/06/2024v5.2 | Revisited Epplus GNU LGDL. Decided to document the changes on Epplus. So far only 1 change was made. |
| 04/16/2024v5.2 | Added function for the 4th field of command GetFrom. When this 4th field is present, it serves as the key to locate the source record from which the field value by the name of 3rd field is copied over. |
| 04/30/2024v5.2 | Tuned and tested the 3 dll commands: eatdll, oopdll and oehdll. |
| 06/07/2024v5.2 | Added account hierarchical charts for EAT. |
| 06/17/2024v5.2 | Added 4th field as user key for formula PullFrom. |
| 08/09/2024v5.2 | Added the command RepeatRecordX1 as a variation of command RepeatRecord. Its column B is an insert which represent the second prefix of the cycle sheet. Please refer to the commnad RepeatRecord for more detail. |
| 08/09/2024v5.2 | Fixed OneFile bug which shows the cycle sheets are not written out. |
| 08/09/2024v5.2 | Added a key word LastOf in math calculation. The format is LastOf:FieldName. This will retrieve the value from FieldName in last record. The field value is expected to be ready so the filed in the math formula does not participate the dependency sorting. |
| 08/16/2024v5.2 | Revised to include the LastOf field in the dependency sorting. |
| 08/19/2024v5.2 | Added a Case formula for GetFrom. |
| 08/21/2024v5.2 | Revised and completed 2 Case formulas, one (MathCase) for calculation and the other (MoveCase) for data movement like GetFrom. |
| 08/22/2024v5.2 | Tested MoveCase, and concluded that it only works when Conditions contain the user-entered fields, not the fields that are calculated and copied. |
| 08/29/2024v5.2 | Optimized the Dependency Sorting process, and reduce memory size. |
| 12/11/2024v5.2 | During the previous few months, changed the all command names so that they are more fitting in enginnering principles. For example, change 'type' to 'DfnType' so the command becomes more unique and grouped in same category of 'Dfn'. 'Dfn' means 'Define'. |
| 12/12/2024v5.2 | Added a directive Round which instruct to round a field value in math. Please see the command 'DfnType'. |
| 01/07/2025v5.2 | Added 2 commands: SetOrientation and SetCalculationPrint. |
| 01/13/2025v5.2 | Removed MoveCase for simplicity of code maintenance. If a set of external fields is needed, use GetFrom to move them all over for calculation. |
| 01/13/2025v5.2 | Modified the OneFile output that enhances analytical capabilities. |
| 01/13/2025v5.2 | Restored the Save function that saves input files into Directory Save. A switch on Page Model can be used to turn off this function. |
| 01/24/2025v5.2 | Added 3 directives to GetFrom formula. They are 'key:2024.12.13.1234', 'field:name:value1,value2,value3', 'logic:[taxable] |
| 01/24/2025v5.2 | Tested and documented the 3 directives to GetFrom and PullFrom. Search for GetFrom for further information. |
| 01/29/2025v5.2 | Completed the Excel Cell dependency hyper links. User can click a link that takes the user to the source cell. |
| 01/29/2025v5.2 | Updated the Excel Cell dependency hyper links. User can click links that take the user either up or down. |
| 02/03/2025v5.2 | Enhanced calculation and transfer algorithm. |
| 02/04/2025v5.2 | Tested and tuned Cutoff function. The result is good. There are only 3 items, 1=change model to dismount bank directory, 2=change outdated input file names to dismount, and 3= add the new cutoff SetInitValue command sheet and dismount the old one. |
| 02/05/2025v5.2 | Updated user interface to include several "Copy Full Path" function. |
| 02/09/2025v5.2 | Added a function page in Second Panel for Amazon.com. The function parses Amazon's Transactions page and GisfCard page to generate the accounts for financial analysis. |
| 02/10/2025v5.2 | Added 2 commands, ActRemoveDuplicates and ActBcRemoveDuplicates, to remove duplicate rows based on field values. |
| 02/13/2025v5.2 | Added web site support ticket protection. |
| 02/13/2025v5.2 | Added a checkbox option to allow saving the lists of tasks in Second Panel. |
| 02/17/2025v5.2 | Completed a template of a sale model that includes Loaction, Emplyee, Inventory and Sale Tansaction. This template is able to show remaining quantities in Inventory, the sale's amount by Month, Location, Employee and Item Number. |
| 02/19/2025v5.2 | Completed an integration of reading input files as Csv file type. |
| 02/22/2025v5.2 | Revised the hyperlink presentation, so that a hyperlink can be used to navigate through accounts more friendly. |
| 03/10/2025v5.2 | Upgrade Oop.exe and Oeh.exe to have NameSpace by class so that User can provide different or hierarchical NameSpaces. |
| 04/07/2025v5.2 | Add StringCase which acts like MathCase except the values are treated as string. |
| 08/04/2025v5.2 | Adjust file names in format of word by word, which means words are separated by hyphen, within a word char Space is replaced by Underscore. Need more test to complete. |
| 09/25/2025v5.2 | For coomand 'ActBcCopyAccount' and 'ActCopyAccount', the destination account records are completely allocated to new memory buffer so that no overrides would occur. |
| 09/29/2025v5.2 | Added a command SetDefaultGroupFirstRowColor which uses default group names. Note the difference between it and SetGroupFirstRowColor. |
| figure 8001 | |
W. History of Epplus Changes
1. The changes
| Date | File | Line | Description |
| 04/01/2024v5.1 | na | na | sample line |
| 04/05/2024 | ExcelWorksheet.cs | 4244 | After a sheet was added to another book, the ConditionalFormatting was not aaded along with. So this 'set' method could allow to set it from source. |
| 04/06/2024 | ExcelComment.cs | 92 | fake entry |
| 05/02/2025 | ZipEntry.Read.cs | 275 | Epplus code saves a file, then it can't open the file by itself. Based on discussion on https://github.com/EPPlusSoftware/EPPlus/issues/605 and https://github.com/EPPlusSoftware/EPPlus/issues/1808 , this change seemed to fix it.. |